Unity is one of the most popular game engines out there for creating 3D games. However, if you’re just getting started with character animation and want to know more about how Unity works from start to finish, then you’re in the right place! This introductory guide to Unity will give you a practical understanding of how to import your character model, import settings for your animation asset, retarget the animation onto your rigged character, and loop animations to create everyday video game actions such as a run cycle.
Tip: If you’ve never used Unity or any other 3D animation software before, start with this crash course and Unity’s learning path tutorials.
If you’d like to follow along, I recommend you download the complete guide, which includes more detailed instructions, plenty of helpful screenshots, and links to the resource files that are freely available for you to experiment with. Download The Ultimate Guide to Character Animation in Unity for Free.
The basic setup of a Unity project
Before diving into all the complicated stuff, take the following steps when starting a new project:
- Make sure you’ve installed the most recent LTS (Long Term Support) version of Unity to ensure maximum stability and compatibility.
- Select the Universal Render Pipeline (URP) for your project. You can select HDRP, but it's more complex and suited to larger projects.
- Get your viewport layout into a formation that you understand.
- Right click in the project window to create a new scene and select Create → Scene. Double click to open the scene, as this is where we will import your character mesh.
What you need to know when importing a character into Unity
When you import a 3D model into Unity from an fbx file, you’re importing three things into your project view:
- The character’s main mesh
- The character’s texture files
- The character’s rig.
On import of any 3D object, the first step is to check dependencies for those three elements and make sure everything works as it should (eg. check your normal maps are applied correctly). The next step is to define a folder hierarchy for your assets. Naming your files and folders appropriately is often overlooked, but it can make a huge difference when working with a team (or even on your solo project). You’ll likely want a “textures” or “art” folder for all 2D imagery. Creating subfolders for each character will help you keep track of everything. Trusty folder names will help you work efficiently. Most fbx files will contain the referenced textures within the fbx itself. You can keep everything as is or create new texture associations outside of the fbx. This makes it easier to change textures later on.
Convert your character to a “prefab.”
One of the unity animation advantages is a feature called “Prefabs.” Once you’re happy with how your character is imported, you can save it as an “Original Prefab”. This saves your character as a reusable asset that you can easily re-use (kind of like a blueprint). When imported to other scenes, the character model will always adhere to the setting of your Original Prefab. Basically, it saves you from remembering settings and repeating work.
Another advantage of Prefab characters is that you can create prefab variants. These variants are like instances of the prefab (exact replicas) but have key properties overridden (e.g. color or texture). You can update your main prefab, and all prefab instances will update while retaining their overridden properties.
How to Set a Character Up for Animation in Unity
Your rig will still exist on import of your character mode, but Unity won’t understand it correctly. Unity works off an avatar system that classifies objects as ‘humanoid’ or not. Keep in mind that the same concept and process applies to imported animation assets.
Here’s a high-level overview of what needs to be done to make your character rig and animation asset ready for use:
- Set the animation type to humanoid.
- Check that all bone mapping was done correctly.
- Add the animation component and controller.
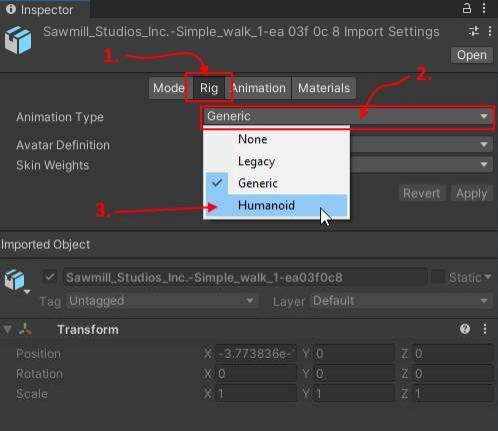
Let’s get into the specifics. To change the avatar definition, go into the Rig tab of the inspector. Change the Type to humanoid, and set the avatar definition to “create from this model.” Click “Apply”
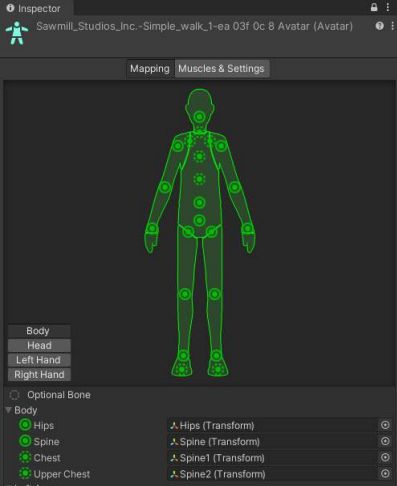
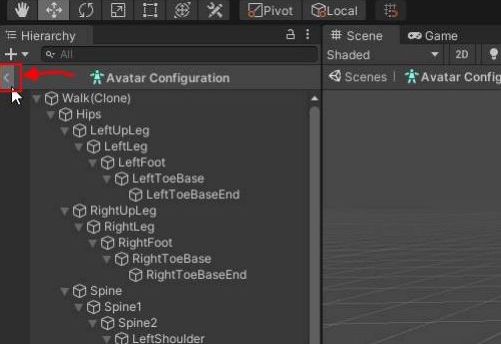
Once applied, the “configure” checkbox will become active. Click it to open a new inspector view of the rig’s bones. You’ll need to check these have been mapped correctly (without mapping, your skeletal animation will distort). To do so, simply click the bone, and check that the correct corresponding body part is highlighted in the inspector. Not all the bones will be mapped, but as long as the bones represented by a solid green circle have been correctly interpreted, your character should have no problems with animation. You can also add new bones if needed, but ideally, your character should already be fully rigged.
Once you’re done and happy, click the little arrow on the left of the Hierarchy window to go back to your regular viewport.
And that’s it! Your animation and character rig are now ready to be tweaked and applied. To learn more about how to set up facial animations in Unity, download the full guide here.
Correcting looping animation clips for your game characters in Unity
Depending on your animation clip, you might have a few minor animation errors or an animation that does not perfectly loop. You can fix these issues directly within Unity (where you’ll find a few great tools!) or within a preferred animation package you’re more comfortable with (e.g. Blender). If you’re sticking to Unity, let's go through how you’d fix a run animation that’s not looping as it should. When we hit the play button in the animator window, you can see that the loop is far from perfect. To fix it, we can use the animation tab to adjust the frames for our looped animation and cut out any unnecessary issues.
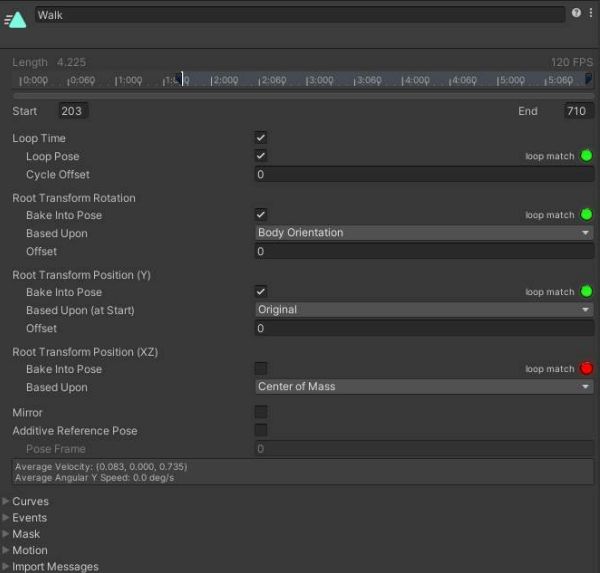
Inside the inspector, you’ll find a few great tools:
- The length slider that dictates the start and end frames of the animation
- The loop time checkbox lets us loop in the preview
- The loop pose checkbox tries to match the start and end pose keyframe
- The cycle offset which allows you to start animations at a specific pose
- And plenty more related to the root of the model. Download this guide for the complete list.
Our example has a few issues, including a frame of t-pose at the beginning of the animation. We can remove that issue by simply telling the animation loop to ignore those problem frames using the length slider.
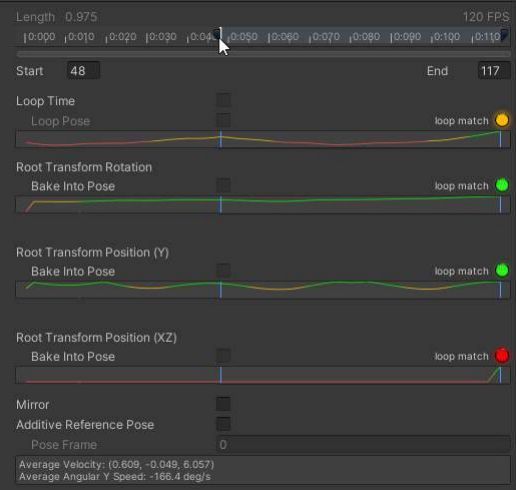
When you start adjusting the slider, you’ll see a series of curves pop up. These indicate how accurately the loop would match with your length change applied. With a few adjustments, we can make a smooth run! When creating looped animations like this, keep the animations as short as possible. This makes transitions FAR easier and makes it much simpler to layer logic.
What is the Animator Component in Unity?
With an animation clip ready (or a library of new animation clips!), you can finally get to animating your character in Unity. The animator component is what dictates what clips are played on a character. It uses input from the animation controller, where we dictate what animations should play and set up the logic for transitions.
How to add an animation component and controller to your character
Select the Orignal Prefab of your character and add the animator component inside the inspector. Set the avatar to your character name. Next, create an animator controller within the project tab, name it sensibly, and save it within its asset folder.
How to use your animation clip/asset and turn it into a ‘state’
Double click the animation controller to open the animator tab. In place of your hierarchy, you’ll see a panel with two options; Layers and Parameters.
- Layers are a way to see how multiple animations will overlap and interact. It's great when a character has to perform two actions at once (e.g., run + shoot). To learn more, check out this tutorial.
- Parameters are variables that we can modify to control the animation logic.
When you’ve opened an animation controller, you’ll notice the colored blocks with states in your viewport. These states are what any character can use to move. Just drag and drop your clip into the viewport to create a new state.

Building character movement logic with the animation controller in Unity
Now you have a simple state, but what if your character wants to transition between states? This is why game developers build transition rules called state machines. You can set your states to calculate as a Float, Integer, Boolean, or Trigger (each has a different function in code).
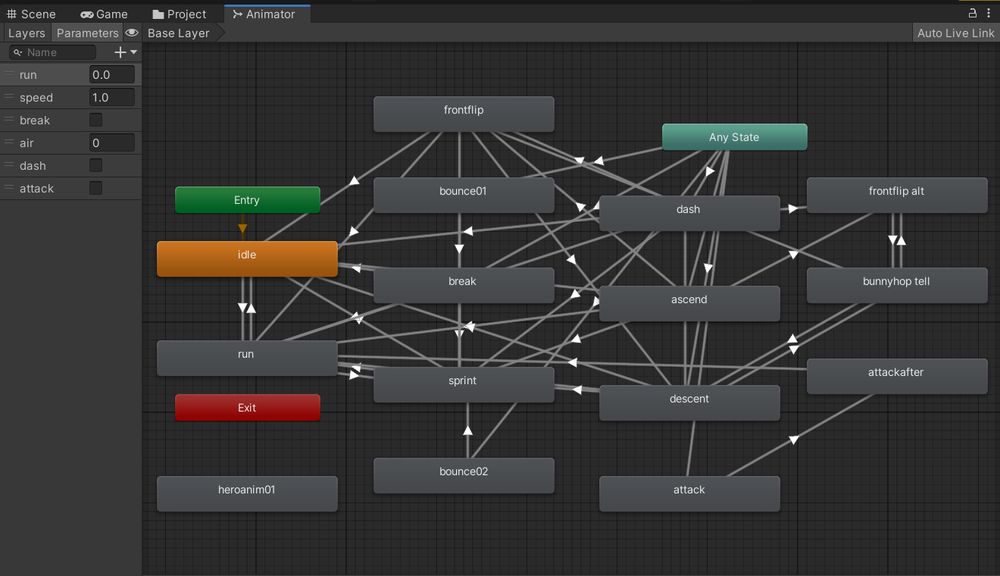
Here’s what a simple state machine looks like:
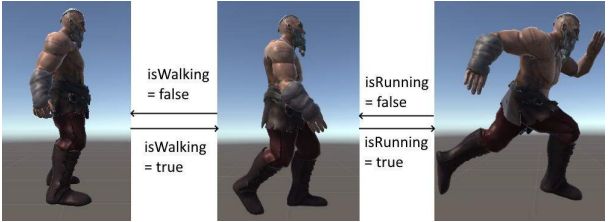
Here’s what a state transition setup might look like on an actual animated character. The idea is that a character in the idle animation state (1st image) will never be able to go into the Running state (3rd image) before transitioning to the walking state (2nd image).
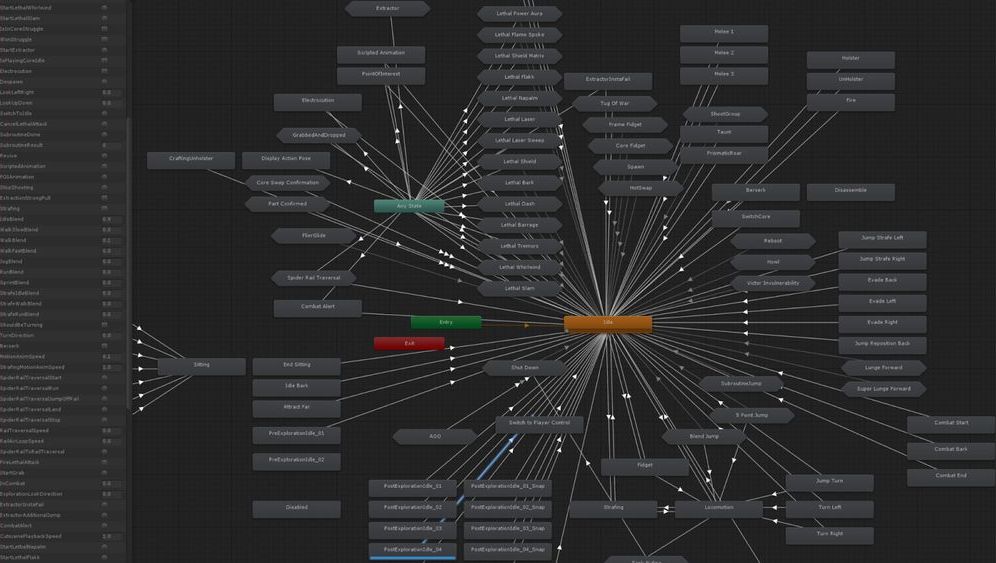
While this might look easy to understand, things can get complicated when you’ve got state machines that allow characters to move in 8 different directions, at different speeds, and have different actions. It might lead to a state machine near impossible to comprehend quickly.
And as mentioned on the Unity forums, even sub-states don’t make it easier to keep track of what’s going on.
Hold onto your keyboard because we’re about to introduce another layer of complexity. Say hello to Blend Trees.
The power of Blend Trees is that it allows you to keep your animations bundled together under a single node. Instead of using explicit parenting relationships between objects (which can get confusing quickly) you rely on variables-based controllers. This makes managing transitions easier by organizing how your logic works visually,
It's time to graduate to intermediate
You now know how to import characters and animation and set up the beginnings of a run or walk cycle — congratulations! There’s so much more to learn about Unity, including recording facial mocap, coding with C#, and attaching those 8-directional blend trees to weighted commands from a player. If you want to dive deeper into Unity, download this free Ultimate Guide to Character Animation in Unity and develop that game! You’re also welcome to join Rokoko on Discord. We’re a fun-loving bunch of animation nerds that are happy to help you get started.
Frequently asked questions


Book a personal demonstration
Schedule a free personal Zoom demo with our team, we'll show you how our mocap tools work and answer all your questions.
Product Specialists Francesco and Paulina host Zoom demos from the Copenhagen office


