
Cinema 4D Retargeting Workflow: The Ultimate Guide to Retargeting in C4D
Below, please find a transcript of the video tutorial. Enjoy!
Intro
Hey, what's going on everyone? I'm Sam, creative director, former Rokoko, and welcome to our Ultimate Cinema 4D Retargeting Tutorial.
So I say the ultimate kind of tongue in cheek because this is cg and there's a million different ways to do anything in cg, right? So this workflow is just one way to do retargeting of motion capture to characters in Cinema 4d. And it is the way that I do it. It's the way that I would recommend you do it, but that doesn't mean this is the only workflow to do retargeting, right?
So in this video, we're gonna go soup to nuts. We're gonna take a character, we're gonna rig it on Mixamo. Although this workflow can work with any rigged character, with any skeleton. If you made it yourself or bought it online, we're just gonna use Mixamo as it's a good kind of default on which to learn these principles. And also because beyond just doing the regular retargeting we're gonna do in Cinema, I'm gonna walk you through a Mixamo control rig workflow where you can edit your motion capture really easily in Cinema 4d. And that just works best with Mixamo skeletons. So without further ado, let's get into it.
Export Rokoko Studio Mocap (1:13)

Okay, so here we are. I've already recorded some motion capture into the new Rokoko studio. So this workflow will work with mocap you've recorded into Studio Legacy or even Rokoko video motion capture from our new AI motion capture tool. It doesn't really matter, this workflow will work for any of those. But as you can see, you know, here we go. Do my fingers, give a little wave, gotta do my karate kicks, you know, jump around a little bit and then yeah, patting the top of my head. And you can see that I don't quite make contact also with the clap and that's because, you know, that's typical of an inertial motion capture suit. It's an approximation of your data of your motions, right? So there's gonna be instances where you don't actually touch the top of your head or a body part or for clapping, you know, this is, you'll often find things like this that you need to correct and that's why it's so important that we're gonna be going through and showing off some mocap editing techniques as well for this workflow.
So, okay, so we need to export this out. So I'm just gonna go and I've already renamed it, add it to the export list, and we're going to export out an fbx. We don't need a body mesh, we don't need a face because we're only doing body and finger data. And for the skeleton preset, we're gonna select Human IK but you can also use Mixamo or Rokoko Newton. I wouldn't use Unreal Engine but I like using human IK. I find it's just very reliable and versatile as a skeleton. So that's what I'm going to be using and that's what I typically use under preset overrides. I'm gonna go under rest pose and I'm going to change this to a T pose. And in theory you shouldn't need to do that, but I find it's good to, to to, to add that for the rest pose under more settings. You know, frame rate 30, it can be a hundred, it doesn't really matter. This is where it's going to export out. And now we can export our clips out.
Find a Character, Rig on Mixamo (3:24)
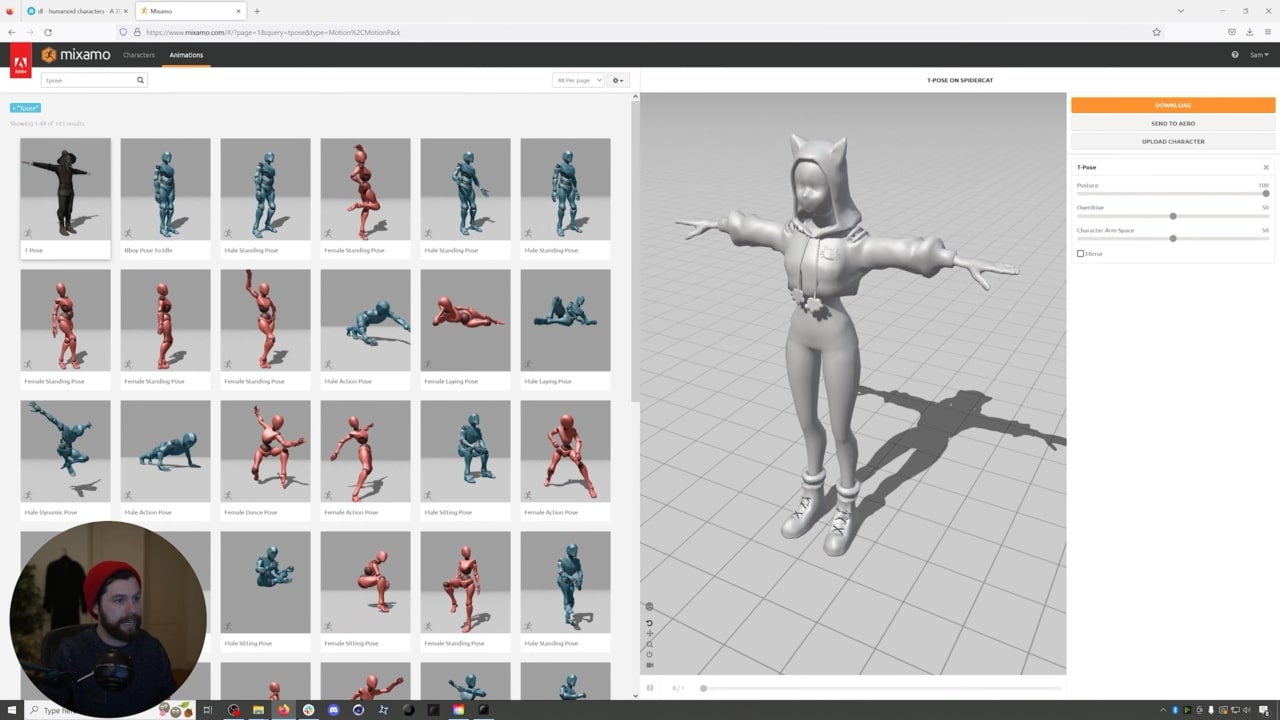
There we go. So while this is exporting, we can look at the model that we're gonna be using. So I just went on to Sketch Fab, I found an OBJ model, this cool Spidercat A pose. We're just gonna be using this as a demo, but we're gonna be rigging this character using Mixamo and that's just because I find it's a good place. You know, you could use this workflow for characters that don't have Mixamo skeletons. But especially for the control rig workflow we're gonna be going through at the end, this character needs to be rigged with a Mixamo skeleton. So that could be, you know, characters from Mixamo or you could upload your own, right? And I've already gone and uploaded our Spidercat character, you know, that process of the auto rigger put on the points onto the characters, different, the wrists and everything, and then hit process. And then once it's done, we're just gonna go and load in a T pose again. So here we go, T poses. And we can download that, which I have done and I've already put into my little raw folder here.
Import and Fix Scaling of Mixamo Character (4:39)
So now we can open up Cinema 4D and let's get into it. I'm using Cinema 4D 2023. It's fantastic by the way, but this should work on older versions of Cinema 4D. It uses the character definition tag, which was introduced, I believe around R 21 or R 23, maybe R 22. But this should be pretty backwards compatible. Certainly if you're on R 23, this workflow should work in, in its entirety.
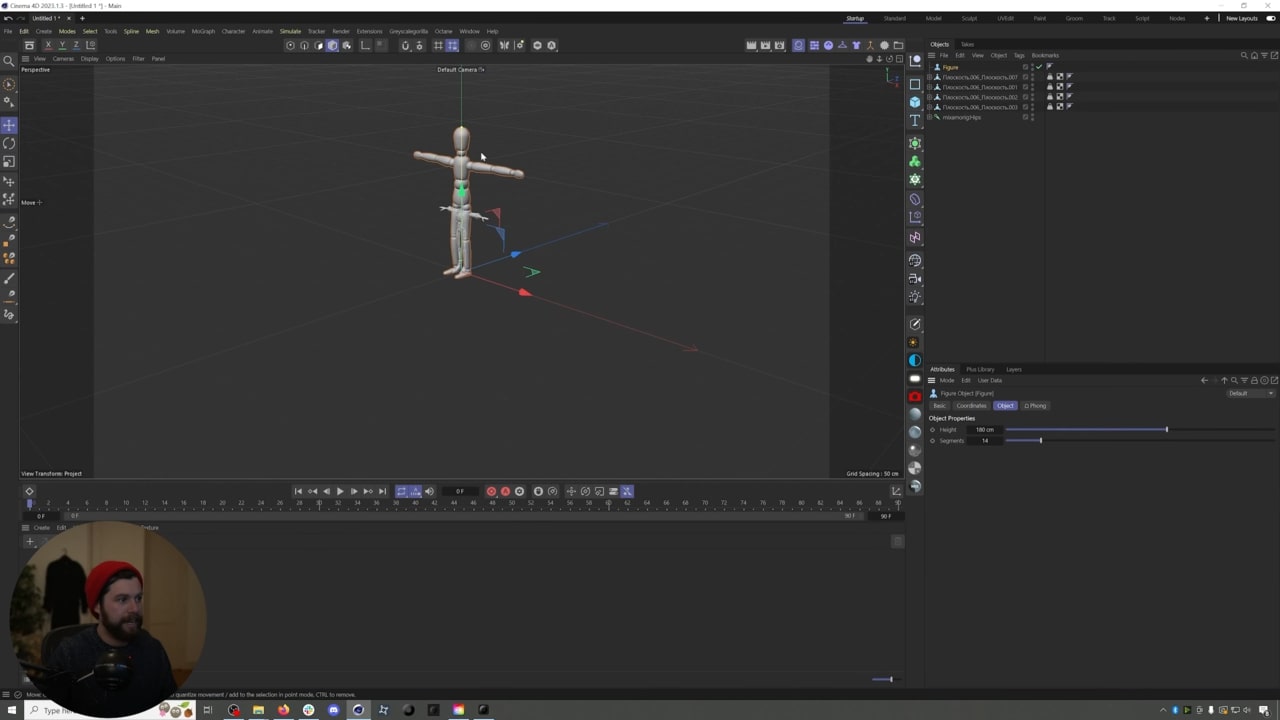
Okay, so here we go. Gonna get rid of my octane. So we don't need that. So the first thing that we need to do is go and import a character and that character that we downloaded from Sketch Fab, we're gonna go grab that. So I'm actually gonna go to file merge objects, go grab our Spidercat, open it up, import it so it's a little bit small. So what we can do to fix that is we're gonna go into our project and we go into our scale and we'll just say project scale in millimeters or no, we'll keep it in centimeters, but we'll scale project current scale target scale is 10. So that should make it just a little bit bigger. And if we want to compare that, so maybe we make it 20. So let's undo that. Go back and I'm hitting Control D to get to my project settings. Let's scale Project 20.
There we go. Now we have kind of a character that's on a better scale here.
Character Definition Tags (6:21)

So if we just wanna retarget this the first thing that we can do is go into our character and right click on our character's hips. And actually let's again, alt G we'll create a no, we'll call it a Spidercat and I just wanna keep things clean. And then we'll right click on the Mixamo rig and we're gonna go to rigging tags character definition. And so this is first we're gonna go through straight retargeting and then we'll do the control rig workflow after this.
So once I've added that character definition, if I hit open manager, this is where we need to tell Cinema 4d which bones are which on our character. So because this is a Mixamo character, if we just hit extract skeleton, you can see it went through and it did a really good job of figuring out which things are which. This skeleton's actually a little bit weird because it was rigged with only four fingers. But that should be fine for, for our purposes. But if you had a skeleton that if you hit extract skeleton and nothing showed up, you can always go in manually and, you know, add in all the bones that you need to. So we could go in and let's say we didn't, if I hit control, hold down control and click on hips we can unfurl the whole thing. But if we went to the spine and let's say nothing was here, you know, or or nothing populated throughout the whole thing, we would go through one by one, right? We click on spine and hey, we'd go and we'd grab all the spine bones, right? Or we'd go through and we'd click on neck and if there was nothing here, we would go and we'd find the neck and we'd click neck and add it in, right? And we'd do that for all of these different bones. So that is all good.
So the last thing that we need to do is we need our character to be in a T pose and this character is again, but if your character was not, you need to go through and change all the bones around and just position your character into a T pose because your character needs to be in a T pose for this workflow. And beyond just a T pose, we also want to make sure that, especially with Mixamo characters, that our thumbs are lying flat against the hand. And that just will help out with thumb placement later. So I'm gonna go and grab the thumbs, right? And you'll see when we import our mocap, we are just trying to get this character in as close a pose to what our mocap's initial pose is as possible because everything is relative when you do retargeting. Any differences between the initial poses will reflect throughout the whole, when we copy over the mocap, it will all be off by how different the poses are, right? And so we can see this in effect when we import our mocap. So after we're done posing our character and making sure it's in a T pose and fixing the thumbs, we can hit set reference pose. So that's going to be the reference pose for this character.
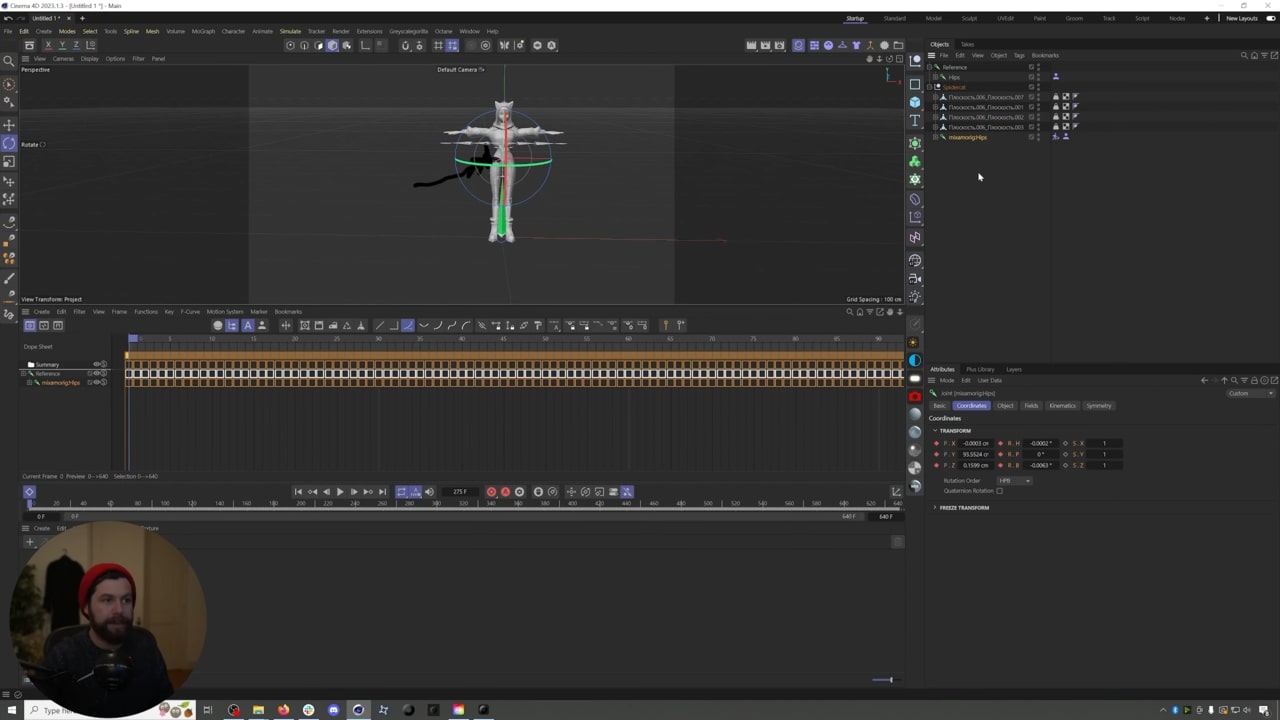
Okay, so now let's go and let's import our motion capture. So again, we'll go to file merge objects, we're gonna go find our mocap, which is right here. Retargeting demo. And you can find where your mocap is saved if you didn't put a destination by just going to open folder. So I went and copied this, right? And then I went into Cinema and I pasted it in here. And here's our mocap retargeting demo. We'll open that up. Here it comes and look at that. We got some motion capture. We'll expand out, let's expand out this timeline about six 40. And there we go. We got our mocap. So how do we get this motion capture onto our character? Well, we're gonna go and we're gonna do the same thing we just did for our character, which is create a character definition on the hips. So right click the hips, rigging tags, character definition, open manager and extract skeleton. And so because we used a human IK skeleton from Rokoko Studio, it was extracted just fine. So that should really never be a problem. You shouldn't have to go in and do it manually for your Rokoko skeleton. And again, set reference pose and you can even look at our mo cap's hands. See, so that's what I was saying about the difference in our character. And you can actually see, so our character went back to this pose and that's because with the, with the thumbs here, that's because when you download from Maximo, there's a couple key frames. So if we right click on our character's hips, we go down to select children, select all of the characters' bones, and then I can just go to coordinates and shift click, select all of these animation, delete track, it gets rid of all the key frames and just leaves it on that frame.
And now if we go back to our character definition and we go to the reference pose, it will snap back to that reference pose that we designated earlier.
Retarget Mocap using Solver (11:57)

Recap: we were on our mocap, character definition tag extracted, skeleton set reference pose, there we go. So now how do we get this mocap onto our character? Well we just select our characters character definition, hit create solver, and then drag in the character definition from our mocap. And now when we hit play, hey look what we got here. We got mocap on our character. There you go.
Bake Mocap to Character (12:32)
So this mocap again, isn't baked onto our skeletons, right? It's referencing, you can see if we click on the hips of our mocap, We've got all these key frames. But if we click on the hips of our character, no keyframes, and if we wanna bake down all of this animation to our character so it isn't just a reference, what we can do is open up the dope sheet. Let's open it up right here. We're going to select all of our characters' hips. So again, select our characters or all of our characters' joints, select the character's hips, right click, go to select children. It selects all the hips of your character. And then on the dope sheet, if we go to functions, bake objects and we turn off create copy, turn off clean tracks, hit okay, it's gonna go through and bake.
And now when we click on our character's hips, look, we got all these key frames. In fact we can even get rid of our motion capture. We just have an animated character. You can see all the key frames. There we go. And we have now retargeted everything.
Control Rig Workflow (13:47)

And so now we're gonna redo this and we're gonna create an IK Mixamo control rig for our character, which has been created on Mixamo and we can do some mocap editing.
So let's create a new project and start from scratch here. So again, this workflow is what I would do if I was retargeting in Cinema 4d. And again, it has to be using a Mixamo character. You can use what we're about to do on a character that has a non-Maximo skeleton, but it just gets tricky. There's a real alignment with Cinema 4D and Maximo. And so it works best, you know, kind of automatically the most automatically using a Maximo skeleton. So we're gonna do it for a Maximo character, which a lot of Cinema 4D people use anyway.
So we are going to go and import our character back in. We're gonna start from scratch, right? Go grab our Spidercat. Remember it comes in super small. So we're going to control D, go to project scale, project target scale 20, just make it normal sized, right? We are going to select all of the joints again, right click on the Maximo hips, select children because we need to delete these two key frames that are down here. Select all of the coordinates, animation, delete track, boom. Those two key frames are now gone. And the first thing that we're going to do is we're going to select all of these skinning tags, select all of them for your character and we're gonna hold down shift and we're gonna hit set bind pose. And so why are we going to do that? Well we're going to do that because this character, if we go into polygon mode, you can see that it's rest pose is actually an A pose, it's not a T pose. And for this to work, we need our character to be in this T pose. So I'm gonna go back to object mode and first actually I'm gonna go in and I'm going to just correct my character's thumbs. Remember we want those thumbs to be as close to laying flat with the hand as we can get just to save ourselves some work on correction later because we're trying to match, remember what comes out of Rokoko studio. So we'll fix those and I would do other things if we needed to with the character like making the hands into a T pose into the arms are getting the legs really under the hips instead of like spread out. So whatever you need to do to get your character into the T pose, right? Make sure there's no key frames. I'm gonna select all of these skinning tags and I'm gonna hold down shift and hit set bind pose. And you can see it kind of, you know, went not opaque but it changed when, when we clicked that, right? And now if I click on this again, right? And I go back into that polygon selection mode, you can see it didn't change, right? So now the bind pose, the rest pose is this T pose. So that's step one.
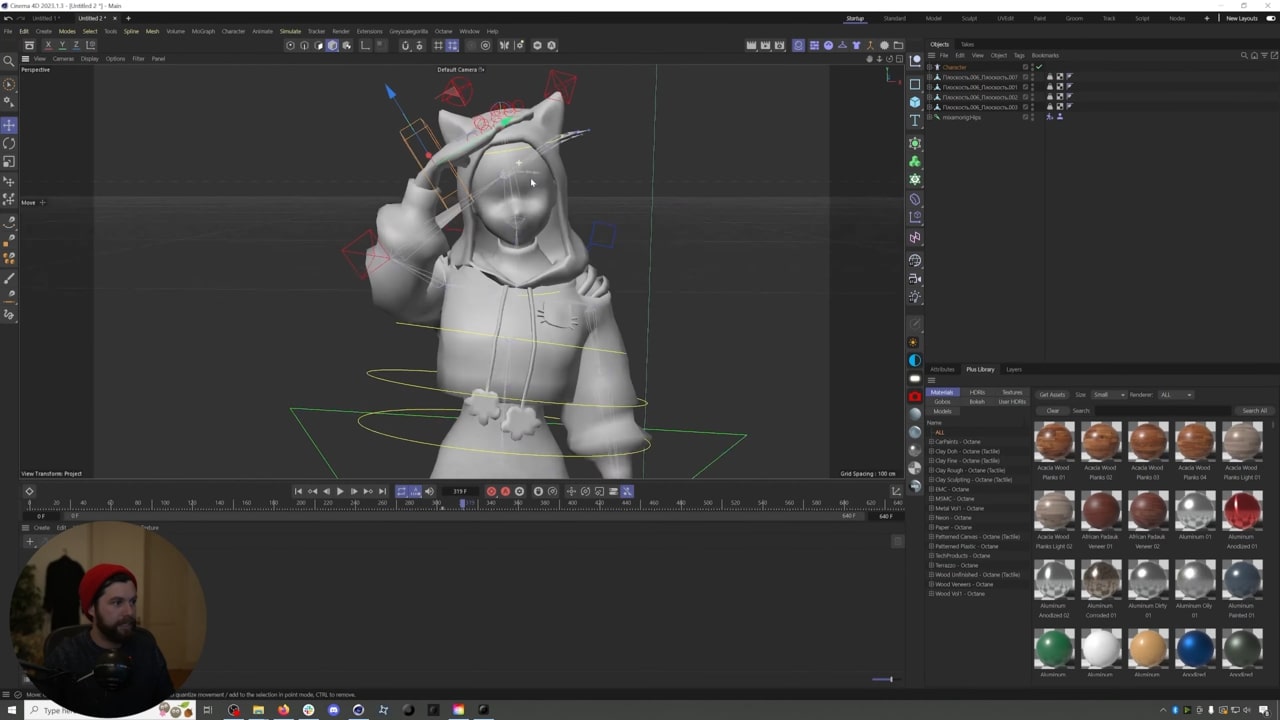
Step two is we're going to go in, we're gonna right click on the hips again and we're going to create our character definition because we're gonna use that as well in this workflow. So open manager extract, skeleton, right? Set reference pose, boom. So here comes the part we're gonna diverge from the workflow that we went through previously. We are going to go up to character and we're going to select a character object and it will pop up right here and it will add some things to the scene. So I'm gonna, you can go through and kind of do this, click for click with me because it can get a little bit tricky. But we're gonna select our character object. We're gonna go to object and under template we're gonna go to Mixamo control rig. And so perhaps you can see this is why this really only works with a Mixamo character. You could create an advanced bi iPad and make your own template. It gets really complicated really quickly. So we're just doing it for Mixamo rigged characters because it's pretty easy this way. So select Mixamo control rig, click root, you can see it added a root click pelvis, it added one pelvis hold down control and click arm. And if we hold down control, it will create a left and right arm. Then we can select each of those. So I'm selecting left hand at a hand, selecting right arm, and adding a hand going back to the pelvis. And if we don't, I could hold down control and hit leg and it would create two legs. If I don't hold down control just to see what it does, it will create the left leg first alone and then the right leg. And that's all we need to do. And so here comes the magic part to know if we're on the right track or not. We're gonna now click this adjust tab and everything should snap to our character. So let's click adjust and there we go. So if that doesn't happen, most likely there's a scaling issue or something really weird has gone on. Maybe there's keyframes still, but something has gone wrong in your process if it doesn't snap and, and you need to fix that before you can keep moving, right? So it should snap to your character. And now if we go to binding, actually we're gonna go to animate. And if we go to weight transfer under animate, I'm gonna close all this out. We need to go find all of our geometry from our character, which is right here. We need to actually, if we go back here, we need to go to that weight transfer, we need to drag in all of our geometry, we can see I'm doing here and hit transfer weights. And as soon as I do that, now you can see we have, what do we have? We have an IK control rig. So this is going to allow us to edit our motion capture using an IK control rig, which is a very powerful thing. Undo all of that. Okay, so how do we do that? Well actually what we need to do before we do that is go to retarget master and hit retarget all. There we go.
So again, what did we do? We added in our root and we added in all of our little Can I show this binding? No, I can't show it. But we added all of our, you know, left leg, right leg, all that we went to adjust, it snapped. Then we went to the animate tab and we went to weight transfer. Under animate weight transfer, we added in all of our meshes. Then we went to retarget master, and we hit retarget all. And you can go back and watch that process if that was confusing. Okay, so now we need our motion capture. So let's go and import our motion capture. Go to sorry, file merge objects. We're gonna go find our mocap that we exported from Rokoko studio. Open it up, let's increase the timeline again, we got our mocap hands working everything. And we're gonna go and under hips we're going to add a character definition tag. Again, open manager extract, skeleton set reference pose. And then for our character's character definition tag, we're gonna select that, create solver and then drag in the character definition from our mocap. And there we go. Look, it's all coming through. Now the difference is that our character now has a control rig, which we can use to edit our mocap. So let's take a look at how we can do that. And sometimes you can see things aren't snapping like immediately And that's because again, the mocap is not actually on our character's skeleton, it's a reference. So we need to go and bake our character's skeleton to get all that mocap onto our character and then we can start editing it. So again, same thing we did last time. We're gonna select our characters, all the, our characters' bones. So right click onto the hips, select children, and that's just going through it, selecting all the bones. You can see they're all selected here. We're gonna go up to our dope sheet. Then with all the bones of our character, again, selected functions, bake objects. We don't need to create a copy, we don't need to clean tracks. Hit okay, it's gonna bake, it'll think for a second. And then we should be able to, let's just do it preemptively. Delete our mocap. No more mocap in the scene. But we do have a character moving.
Mocap Editing (23:45)
And so here's where the magic of our mocap editing comes into play. So you can see if we click on our character's skeleton, we have all these key frames, right? And again, if we were to make changes to let's say the arm, we wanted to fix something in the mocap, we would need to see all these keyframes that are on the arm. We would have to go through and do it for every keyframe where we'd have to delete a bunch of them or something like that. So we want to add edits on top of this motion capture, right? We don't wanna affect the base mocap data, we wanna add edits into our control rig. And fortunately if we select our control rig there are no keyframes.
So what could we do? Let's play through this. Let's select our hips actually, because this is a fun one to show. And we can just move these up and down. Hey, let's move the hips like this. Now the whole take is like this. Let's move it back up. Let's undo both of those. Let's animate that over time. Let's say right here, let's add a keyframe to the hips to the hip controller, right? Then by this point, let's animate it down. Add a keyframe. Let's turn on an auto keying, then at this point up, then at this point down. And look what we got here. We've got animation added on top of our mocap animation. So I'm gonna go through, delete all those key frames. And now let's edit this mocap to fix some of these errors. Specifically, remember this tapping the head. So how would we go and fix that? Well again, there's no key frames on our control rig controller. So I'll select this hand controller. I'm gonna add a keyframe and we turn off auto keying. Add a keyframe right here where I want my edit to begin. Add a keyframe. So this is also, this is not only where we want it to begin, right, this is a key frame that represents the base mocap. So no changes. So this is what we want to go back to this key frame at the end of the edit, right? Because we just want to affect a small portion of this animation. We don't want to affect the entire timeline. So I create a keyframe right here. Then when my hand lands on my head, boom, right here, right landing on my head, hitting my head, I can move the hand into position. Let's say right here I can rotate it. Tap, boom, add a keyframe. So if we play that back, look at that, it's now she is now tapping her head, right? Tap, tap. And again, if I wanted to go back to how it was initially, I would just create a keyframe right here. And then right here I could, if I hold down shift on the timeline, I can kind of create a little, little selection, encapsulate that key frame or I can just click that key frame directly hold down control. If I hold down control, it creates a copy and puts it right there. So now it goes back to where it was initially. So there, there you go.
That is a very powerful technique for just for doing a little mocap editing. And you might need to tweak this and kind of come up with, you know, especially for keyframing, a way that kind of makes sense for you. But hopefully this is enough to get you started with editing motion capture, using a control rig because it's a really powerful way to do it. It's much easier than doing it bone by bone. And and yeah, that, that's pretty much the recommended workflow that we have.
So put any questions you have down in the comments below. There's also a Cinema 4D free project file with a Mixamo character that's already been set up that's in the video description. So feel free to check that out and also play around with this workflow. Let us know what you think about it. You can go online right now and to video.re Rokoko.com. Use our free AI motion capture tool that just uses your webcam and make some motion capture, put it onto a character, see if this works. And, let us know what you think again. So that's gonna be it for this tutorial. We'll have new updated Cinema 4D tutorials coming shortly, that cover face capture and the Rokoko plugin and things like that. But hopefully this gets you started on your retargeting journey and you can start getting some mocap onto some characters and making some cool stuff.
So we'll see you on the next one. Thanks so much. Bye-Bye.
Frequently asked questions
Read more inspiring stories


.jpg)


Book a personal demonstration
Schedule a free personal Zoom demo with our team, we'll show you how our mocap tools work and answer all your questions.
Product Specialists Francesco and Paulina host Zoom demos from the Copenhagen office


