Maya Retargeting Workflow: The Ultimate Guide to Retargeting in Maya
Below, please find a transcript of the video tutorial. Enjoy!
Introduction
Hey everyone. I'm Sam, creative director for Rokoko, and welcome to this ultimate retargeting tutorial for motion capture in Maya. So I say ultimate kind of tongue in cheek because this is CG. And so this workflow is just one of a million different ways that you could do retargeting in Maya. Workflows may differ depending on your specific needs, but this is the workflow that I personally use and can recommend. And even if you're a veteran Maya master, there might be a few tidbits in here that might help you in your retargeting motion captured journey.
So, we are going to get a character, we're going to rig it on Mixamo, but this would work with any rigged character that you might have made or found online. We're gonna download that character. We're gonna get some motion capture into Maya. We're gonna characterize our motion capture and our character. We're gonna retarget our motion capture onto our character.
And then finally, I'm going to go through how to do some editing and kind of final tweaks to really make your motion capture sing.
In my personal opinion, Maya is the best program in which to do retargeting. It just has some secret sauce that makes foot positioning and other things really easy to do. I really recommend this workflow for high-end motion capture.
Without further ado, let's jump into it!
Export Rokoko Studio Mocap (1:26)

So we've already got some motion capture recorded. I recorded this in the new Rokoko Studio, but this whole workflow would work with motion capture that you recorded in Rokoko Studio Legacy or motion capture you recorded using the new free Rokoko Video tool, which is the free ai mocap tool that we just released. So we play back this motion capture.
You can see it's just body and hands data, not face. That'll be another video. And do my karate kick, you know, looking good, touching the top of my head. And you can see with the clapping too, our hands aren't quite connecting where they should be, right? And I did that on purpose. This is typical of inertial motion capture. You might not, you know, touch everything perfectly every time. And that's why it's super important. We're gonna be going through how to do a little cleanup in Maya too, which is really easy in Maya. So that's at the end of the video. You can use the chapter markers to skip around if you want. And yeah, there we go. So we're not gonna go over how to record this. We have lots of tutorials about that. Check our YouTube channel or the description below if you want to know how to record your motion capture. We just wanna know about retargeting this motion capture in Maya.
So we've got our mocap, I'm going to right click add to export list. It was already in the export list, so I just removed it and added it. Again, we don't need a body mesh, we just want the skeleton. We don't need a face because there's no face data. We're gonna export an fbx. And for skeleton preset, we want to go down and click Human IK. So this is a standard Maya skeleton, so we want to use that when we're going into Maya under preset overrides. I also like to go in and under rest pose. I typically just make this t pose. You probably don't have to in Maya, but it's good practice I find to go ahead and do that under more settings. You know, we're going to export it at 30, you can do it at a hundred or whatever you want. Shouldn't really make a big difference in this workflow and we're gonna hit export.
Find Character, Rig on Mixamo (3:38)
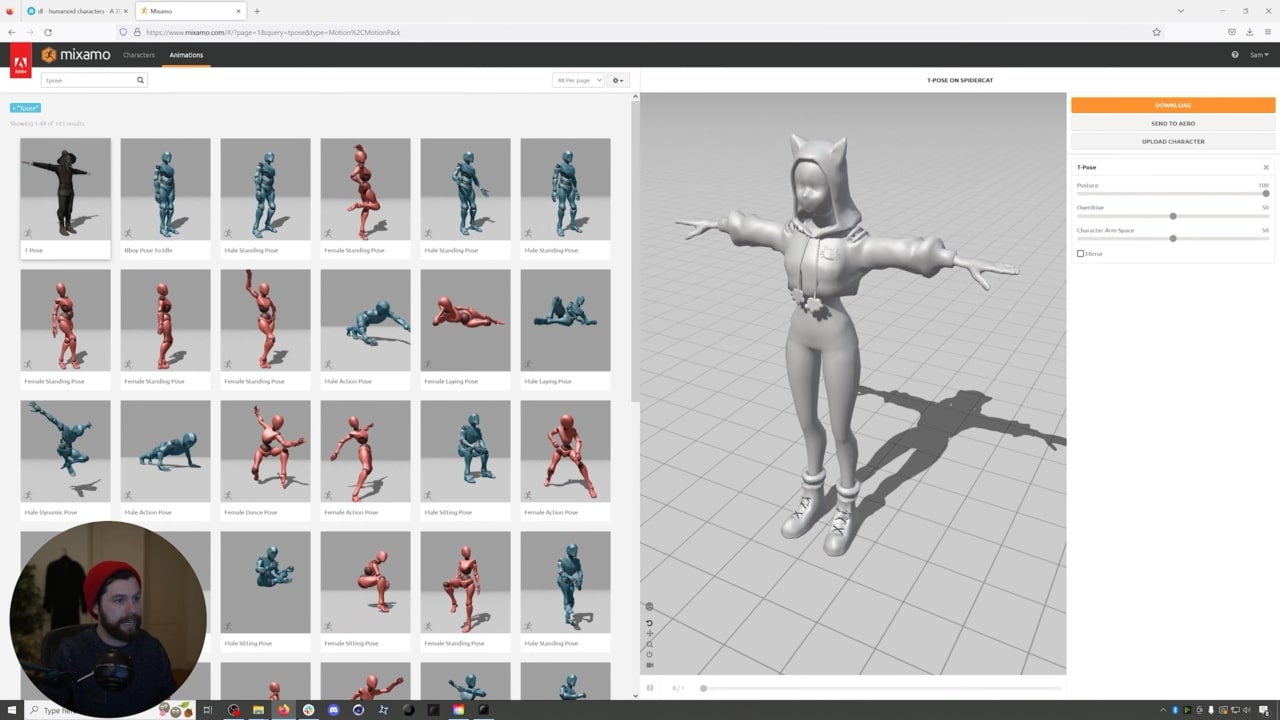
So now we need to go and find a character that we're going to rig on Mixamo, and we're just gonna rig it on Mixamo because it's a good base. It's what a lot of characters kind of their skeletons have, especially for beginners. And I'm just gonna go find a free character model on Sketchfab. And then we're gonna rig that on Mixamo. So I typed in, you know, TPOs and I found this model. So we'll hit download. We're just gonna download an OBJ again, there's tons of tutorials out there for how to use Mixamo of rig characters. You know, I'll let you kind of go and figure that out on your own.
It's very simple, but I just wanted to show the whole process. So here we go. Here's our character. You know how it works with Mixamo. We'll rig it up. There we go. Rigged looks pretty good, although when the arms go up, it probably looks pretty funky, but we're just gonna keep it hit next. There we go. And we are going to download this in a T pose. So we'll type in T pose and we will download FBX 30 with skin. There we go.
"Characterize" our Character Skeleton (5:10)
So it's finally time to open up Maya. So let's launch Maya. So I'm gonna be working in Maya 2022. This also works, this whole workflow works in Maya 23. And in pretty much any version of Maya you might have, this workflow has not changed a lot since at least 2018, Maya 2018. So this workflow should, should work for you really no matter what.
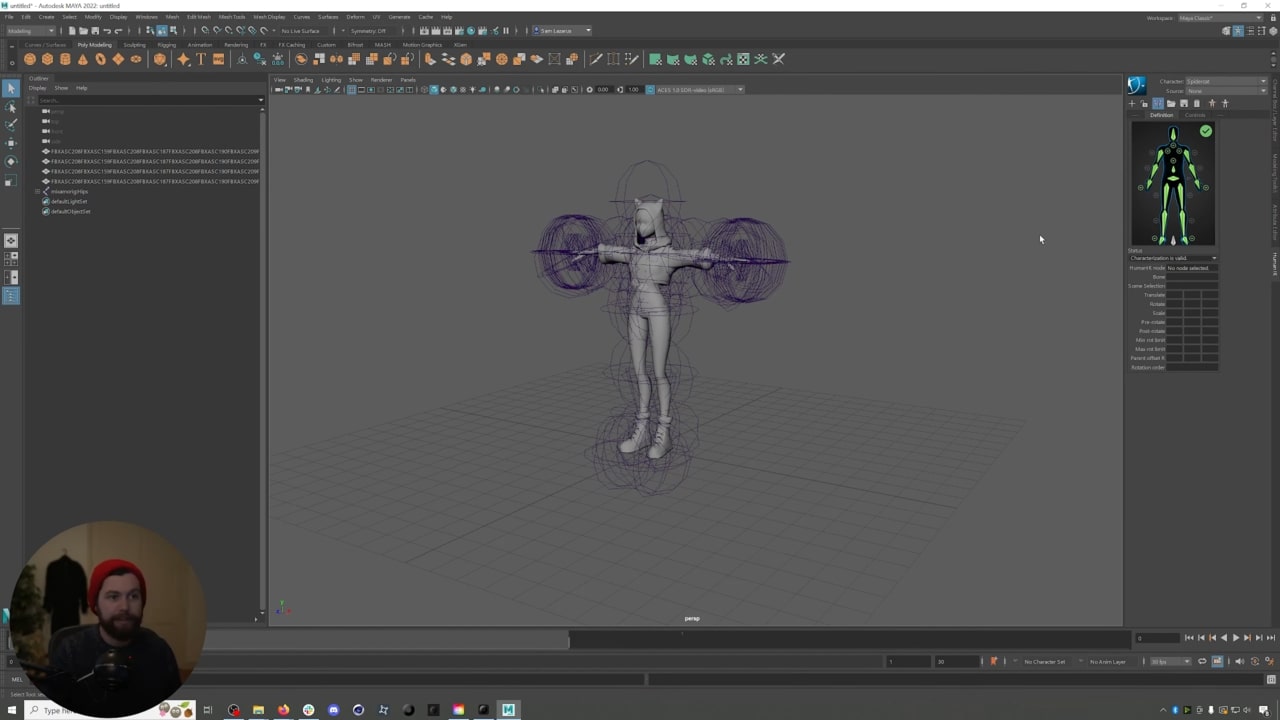
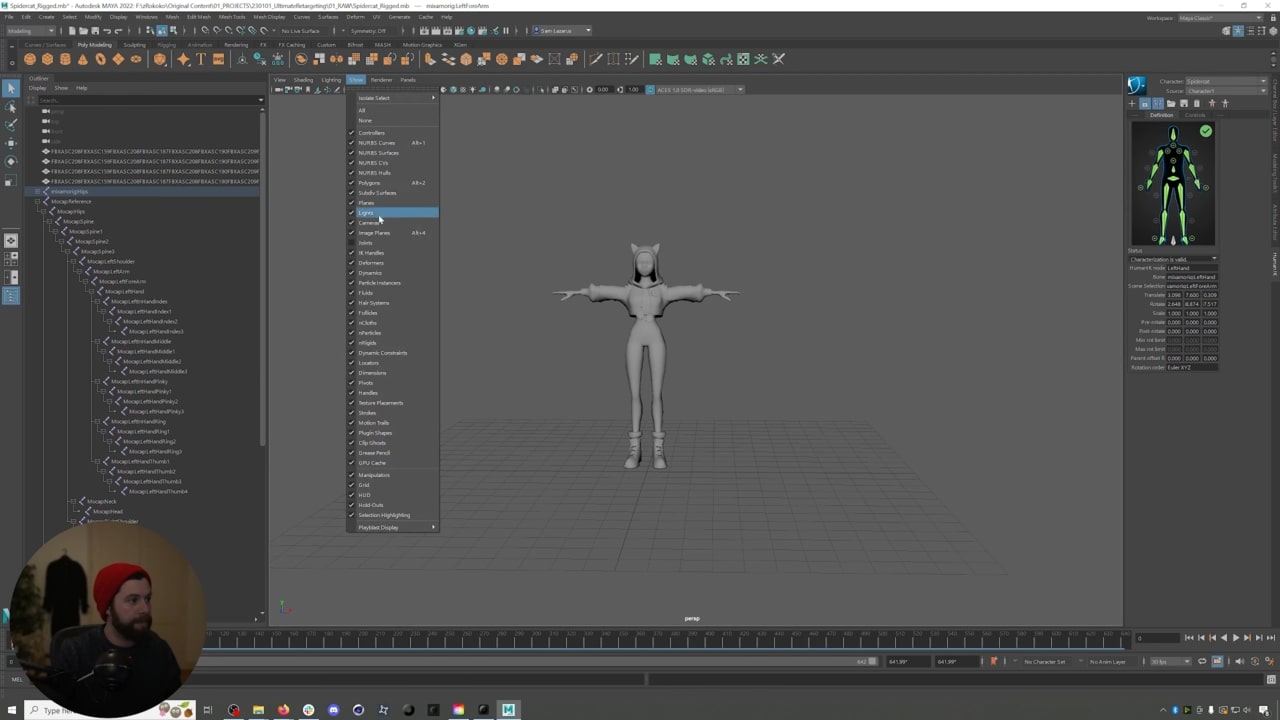
Here we are, we are now in Maya, and the first thing we're going to do is go and import the model that we just downloaded. We'll hit import and there we go. We have our whole model and you can see all the joints here. And so I'm importing the model first, because normally what I do is I go in and I characterize this model. I basically get it all ready to receive motion capture, then I save a nice clean version of this project file. And anytime I want to use this model in the future, I can just open up that project file, it's all ready to go. I put in my motion capture and I keep, I keep moving. So how do we prepare this model for motion capture? So you can see all of the joints here, and I'm actually gonna go to show and turn that off cuz I don't wanna see it.
But what we need first and foremost is for our model to mean a t pose. So no matter what model you're using, again, this workflow can work with non Mixamo models. But either way, your model does need to be in a T pose for Maya. So if you download your model, and let's say it's in an A pose, you know, like this, you would just want to go in and I, I mess with the shoulder, so that looks weird. But you would want to go in, rotate things around so that it's in a proper T pose. And additionally, beyond that, what we, what we also want to do is go in and make sure that our thumbs are lying flat against the hand. And that is because, so we're gonna move this up a little bit. That is because we want our model's initial pose.
So the pose that it's in right here to be the same or or as close as we can possibly get it to the initial pose of our motion capture. And that is a t pose with the feet under the hips so the feet look good and with the thumbs lying flat against the hand. And so this looks good. And so what we're gonna do next is you can see I have my outliner open up here and here's all my hips is we're gonna go through and we're going to characterize this character. So this is step one of retargeting. When we do retargeting, what we're saying is we're, we're telling the software, Hey, take my motion capture animation, which is just keyframed joints with rotational data, transfer that rotational keyframe data to my character's joints. The thing is, Maya does not know automatically which joints are which on your character and on your mocap.
So what we have to do is we have to go in and tell Maya, Hey, this is my character's hips, this is my character's spine. And we have to do the same thing for our motion capture. And it's not that tough, but we're gonna go through it right now. So if we go up here, you can see that we have this human ik panel. So let's click this little person and we're going to create a character definition. So you can see we have a little map here that is going to be how we map out our character. So what we're going to do is we're gonna select hips. I'm gonna right click on the hip bone on this little map and hit a sign selected bone. And then I can go down just using my directional pad on my keyboard to the spine, a sign selected bone go down.
You can see spine one, add selected bone spine two, add selected bone. Then we go to the neck, which is right up here, add selected bone. And then we're gonna go to the head and we're gonna go through and do this for all of the bone. So this is a little tedious the first time that you do it, but we can save a preset so that we don't ever have to do this again with any character with this skeleton. So for example, it's gonna be any Mixamo skeleton that we have in the future we'll have a preset for. So I'm gonna go through and, and we're gonna do this in real time. See I grabbed the left shoulder, I clicked in and you can kind of tell see to the left shoulder view where each thing goes down on my directional pad, a sign selected bone, left forearm, left hand. And you can also see this mirror view is on. So it's going through and it's doing the right side as I go through. So that's nice. Sometimes that doesn't work. If you have a different model that doesn't have a mix of skeleton, you might have to do both sides manually. But again, you can save at a preset. You only have to do it once. Now I'm gonna go in, I'm gonna do my left thumb,
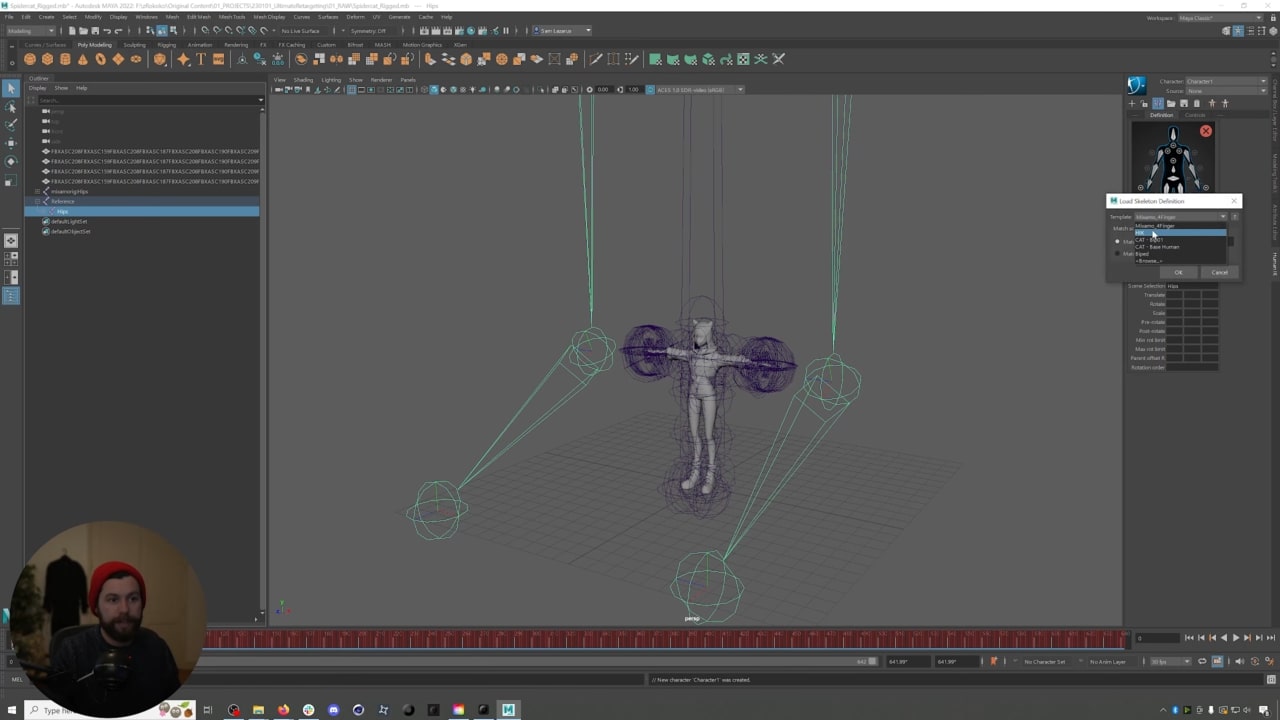
Left thumb one, left thumb two, left thumb three. Generally if there is a fourth bone on any fingertip, we just ignore that. So I'm gonna jump right over to my index finger. And again, this should be, so index one, this should be the first joint on your finger. And then two should be the second. Three should be the third. And then the fourth is a tip null that we don't need. So again, index add index two, index three it looks like for the middle finger, and this is sometimes you have to figure these things out in real time. It only did four finger bones. So we are going to, for this middle, this should be the middle. But then we're gonna clear and then we go and we're gonna do the legs. So left up leg, left foot, left toe base, and there you go. We see we have a little check mark. And as long as you, sometimes it'll be like a warning symbol, but usually even if it is, it'll still work. Like sometimes if your arms aren't completely flat and parallel to the floor, it might give you a warning. As long as everything is filled out here, you should be good. So this is going to be our preset for Mixamo characters with only four fingers, not five because what we just saw, so I'm wanna do Mixamo
Four finger and we're gonna save it. And now next time all we'd have to do is click on our hips, let's actually clear all click on our hips, go to load, select mix of four finger, and boom, it's all set, right? And after we're done, we're gonna lock it. And now we're ready to bring in our motion capture. So we've characterized our character, now it knows which bones are which. So our character is all rigged up. And the last thing that we could do, you know, is just go and go to rename character, character. We could make this spider catt maybe. And then we can save out this project file with a character that has already been characterized and had the bone map all done and is just ready to receive motion capture. So I'll call this spider cat rigged. And this is a safe project file that I can always just import mocap onto this character really easily, right
So now we need to go grab our motion capture. So if we go to file import by default this will be on all files, but I'm gonna go to file type. Let me move this over a little bit here. So you can see I'm gonna go to file type fbx. And then we are going to go find our motion capture, which you can always find in the folder by going back to Rokoko Studio Open folder. So here's our retargeting demo and I'm going to import this. We can mess with scaling and things to get it to come in better. It really doesn't matter with Maya. And usually I just import things and they're, they're scaled kind of too big. But that's fine with me because as long as my character's the scale I want it to be, it shouldn't really affect the retargeting process.
Import Mocap (12:30)
So you can see here we have all of our mocap. What you'd think maybe we would be able to do is just create a new character definition. We would go to none on character and then we could create character definition. Or if we're on Spider Catt, we can go to this definition tag and just hit plus and it'll create a new one. And because there is a preset for Maya human IK skeletons that comes with Maya, we can just select the hips, go to load and go to HIK.
Fix Namepace Issue (13:05)
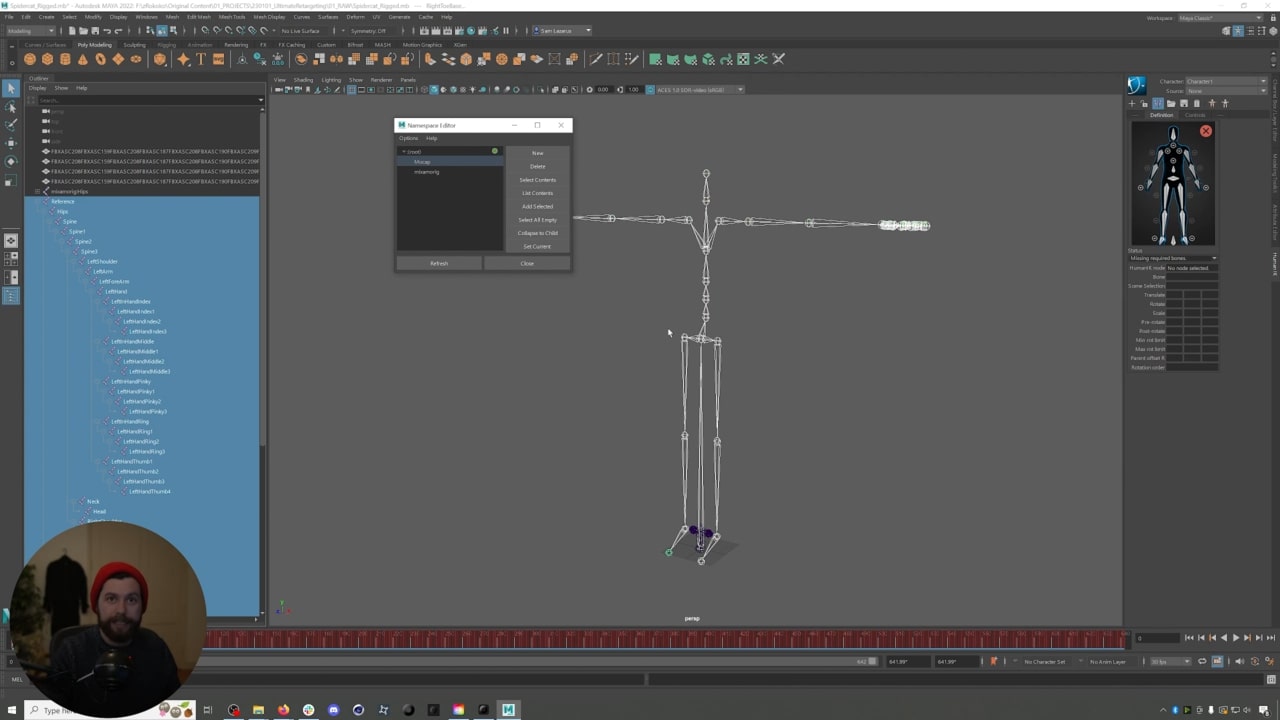
But Maya has a little funny thing where if you import our motion capture and you don't change the Namepace, we're gonna get some bizarre results when we try to use the preset system. So before we do any of that, I'm going to expand out my whole mocap skeleton right here. I'm gonna select all of it. And then I'm going to go up to Windows general editors name space editors, and I'm just going to create a new name space. I'm not even going to name it. I could name it. Let's call it mocap, but you could just leave it as new namespace one. I'm going to select it. And then again, with all of my skeleton, my mocap skeleton selected, right, I'm going to add selected. And you can see it added that mocap prefix to all of our bones. And now we can just select the hips of our mocap
Load in HIK preset. Okay? And now you can see we got green. If we click around on the bones, you can see it's, it's clicking the right bones, right? That's the right leg, left hand, right? It's doing everything correctly.
Retarget Mocap (15:12)
And if we go and we select spider cap for our character and we put in source character one, which is our mocap, we go down to our character. Look what we have here. We've got motion capture on our character and we can turn off joints and you can see here. So that's what we're going to be fixing these issues right there, right? Okay, so mocap is retargeted, but we haven't actually baked it onto this skeleton yet. So this is just a reference, right? It's referencing our motion capture from Rokoko Studio. So we want to bake this onto our skeleton and get rid of our mocap, right?
Bake to Control Rig (16:00)
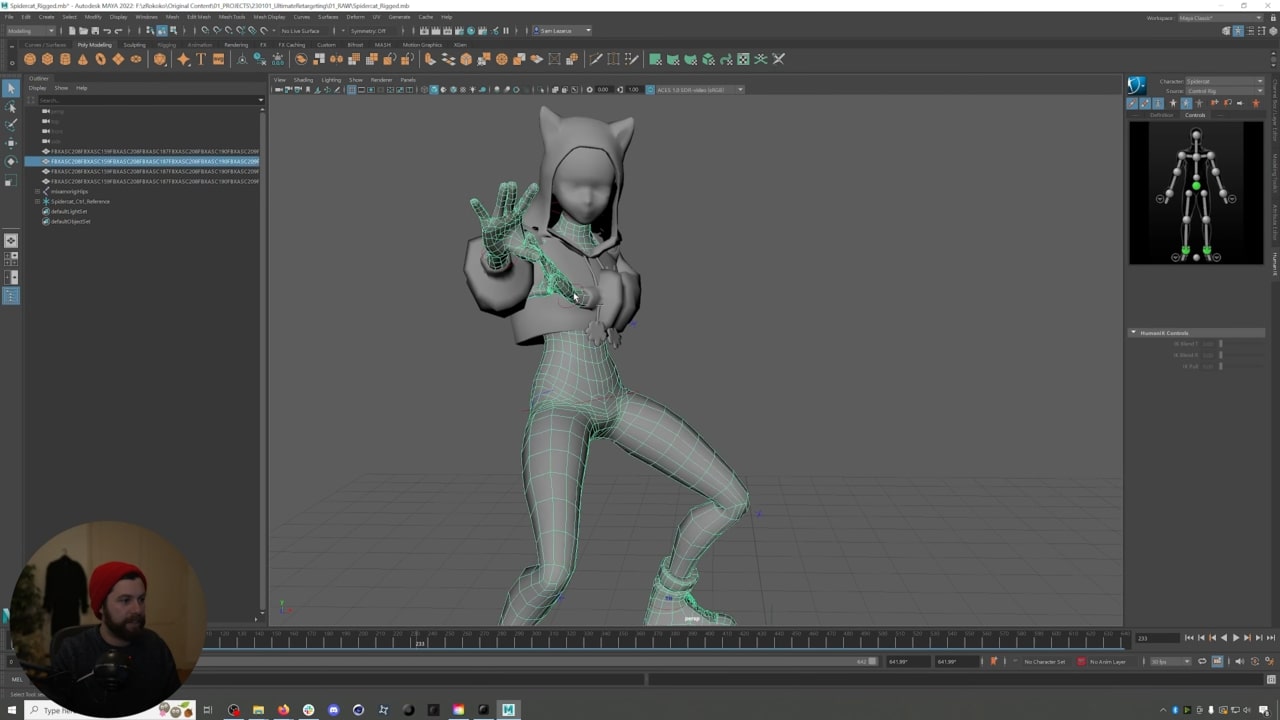
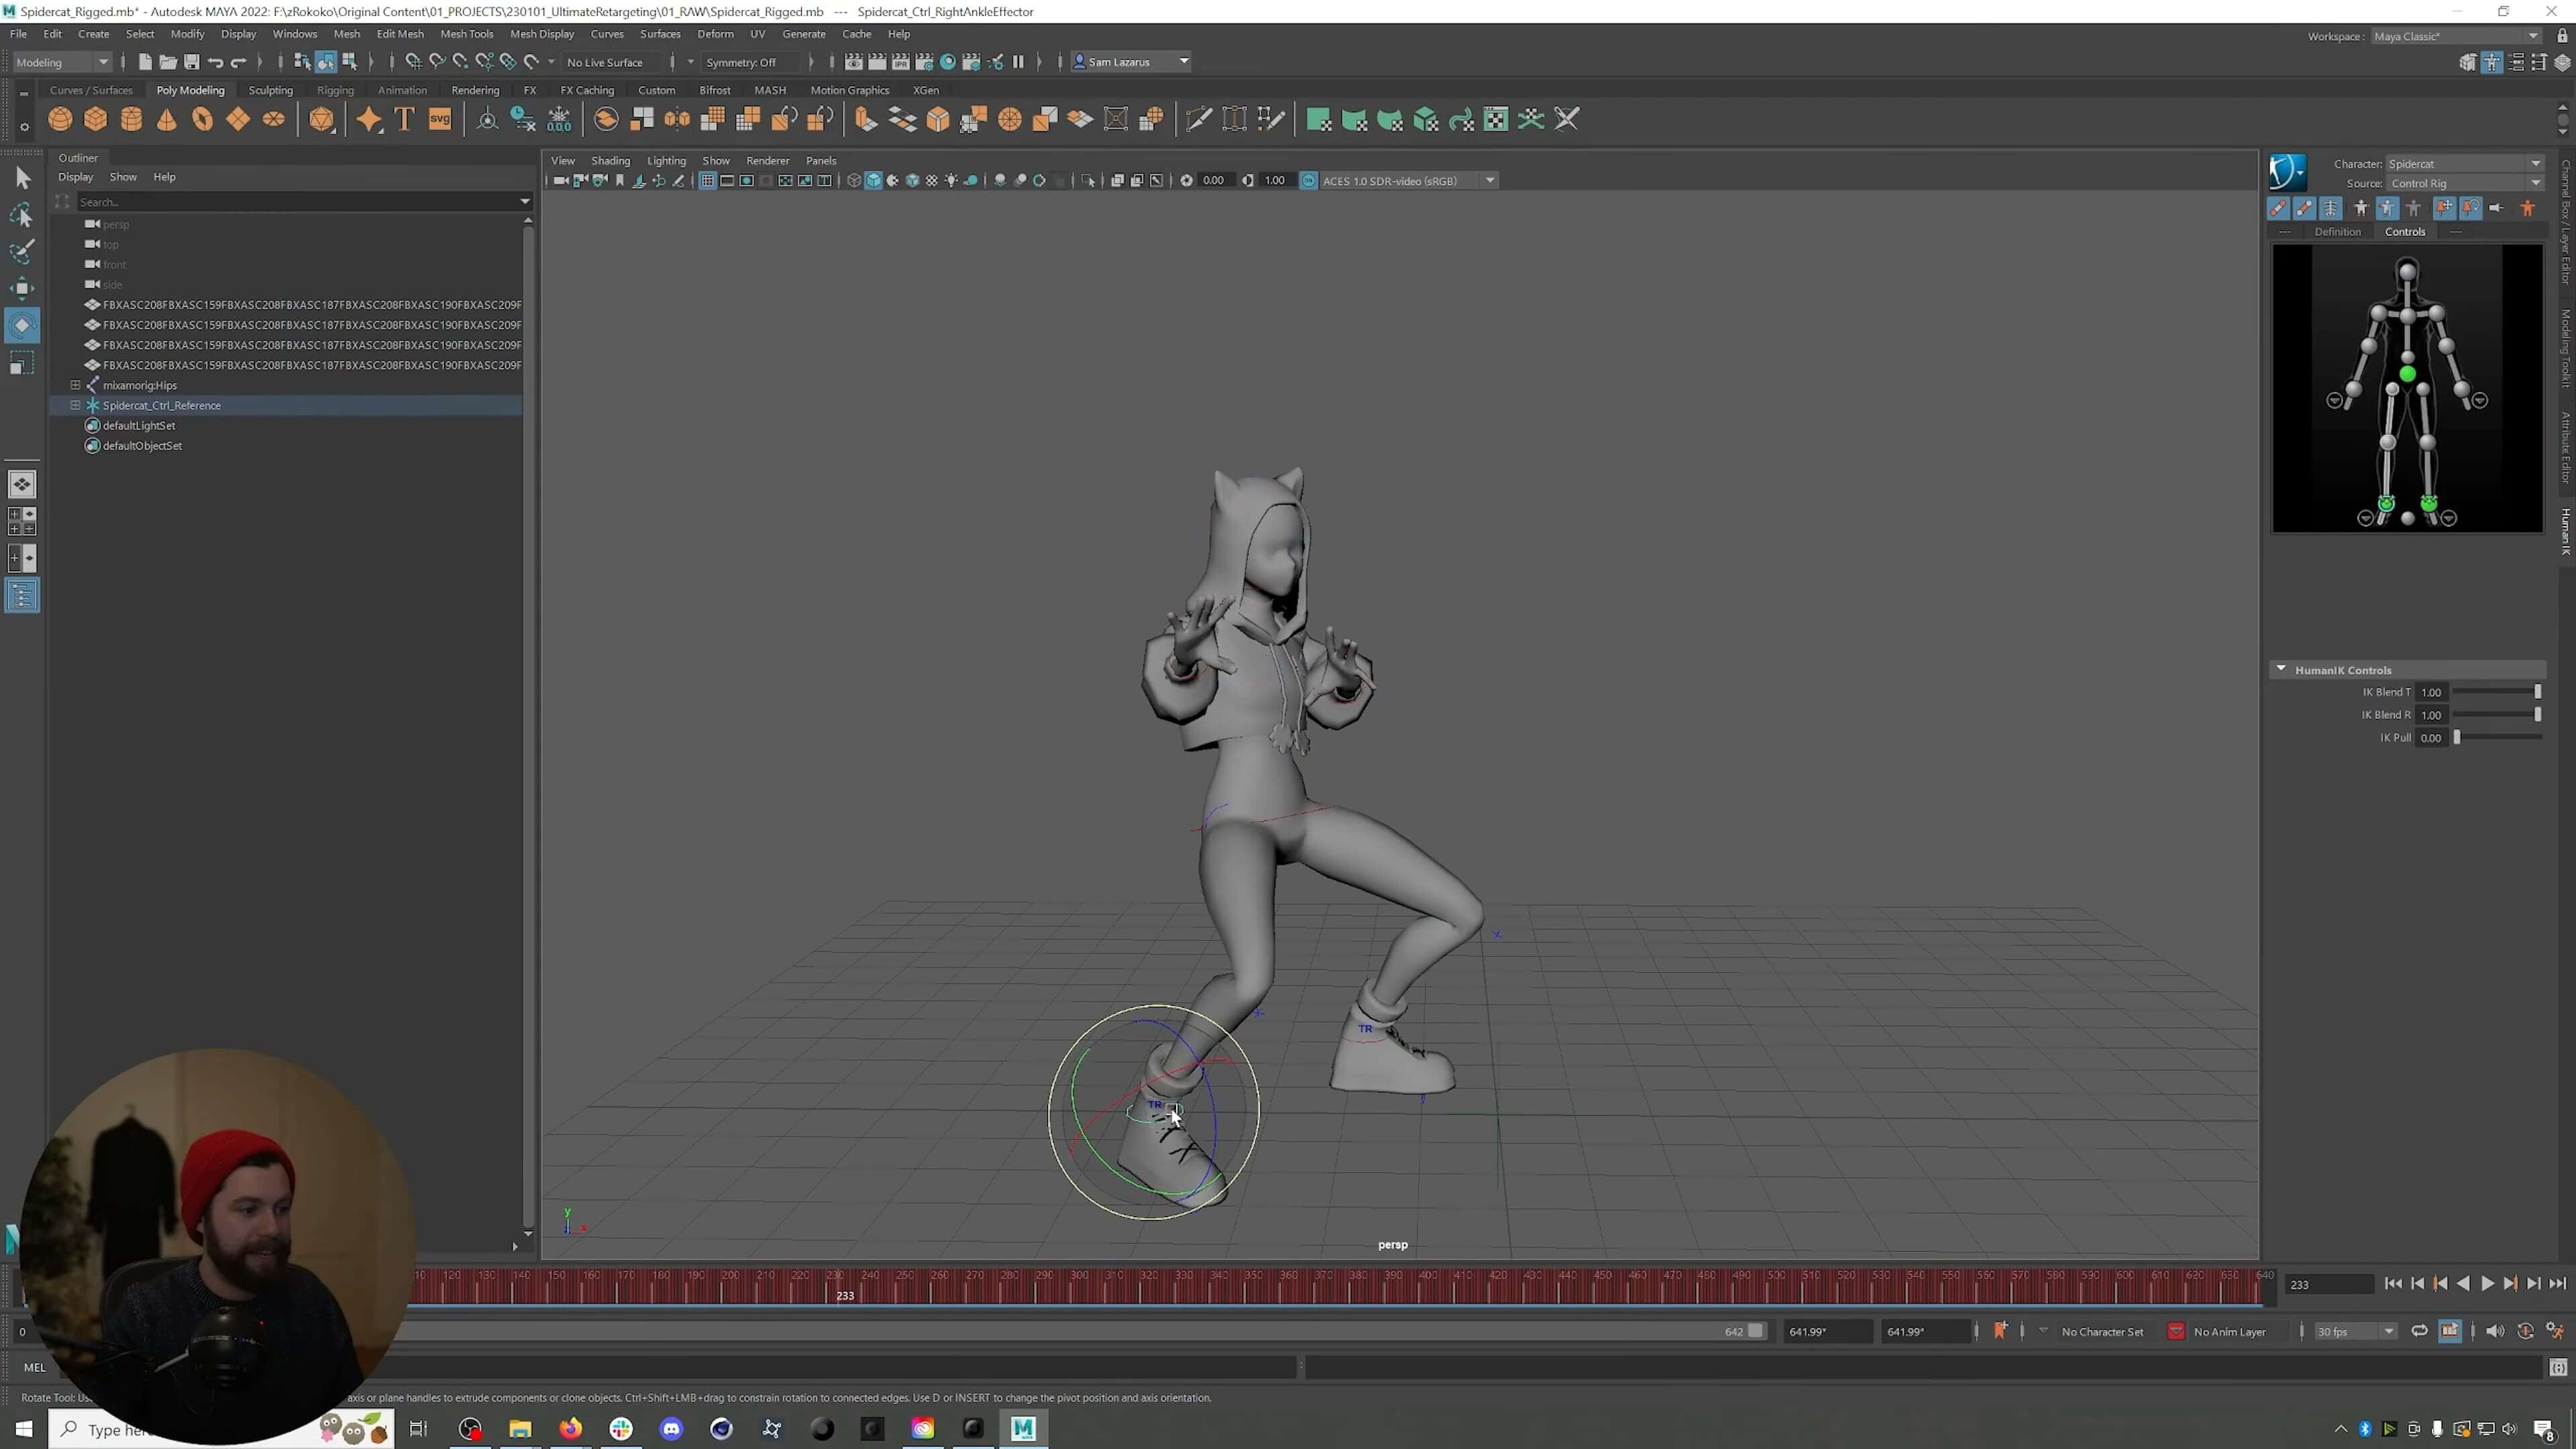
To do that, we're going to select this blue box, you know, while everything has been set up right, here we go, it all looks good. And we're gonna select this blue box and we're gonna go to bake, bake two control rig. So we're gonna, it'll run through and it'll do the whole animation. And what this is going to allow us to do is to go in and do edit using an IK control rig, which is incredible. It makes editing your motion capture so much easier. And that's important, especially when you see right here, right? We have, I have different proportions than this character. So inevitably you're gonna get clipping, you know, that's our clap. We're gonna need to fix that. So how do we fix that? It's actually really easy if you bake it to a control rig. So it finished, we can actually delete this mocap reference. We don't want to delete this spider catt reference. This is, this is all the control rig. But you can see here, let's let's go and if we, if we turn off joints, we still have all these handles for the control rig. And look, we've got an IK hand, we've got IK hips, IK head, although that's not very special, but you know, IK feet.
Mocap Editing (17:25)

So this is going to make it really easy to do some editing. So how would we do that? And you can see, because you can see here, these are all the keyframes of our animation. So in order to make edits to this, we're going to have to use the animation layer system to create layers on top of our original motion capture where we can add additive, additive edit. So what do I mean by that? So again, we've deleted our mocap, we've got everything baked to our control rig. If I go now to channel box layer editor, and I click anim, you can see that we have this base animation layer. But I want to, for example, fix this padding right here, right? I want to pat my head properly. So the way that we can fix that is I could select this handle right here and I could hit, you can see if I hover, create layer from selection, right? Create a new layer that has that, that hand in it. And when I did that, you can see all these keyframes are now gone. So that means we can make new keyframes on top of our existing animation, which is really powerful. So if I want to fix this, for example, I would create a keyframe by hitting s you can see it created a little keyframe here, right here before the fix needs to happen. Then when my hand lands, right, that's tapping the head, I'm going to go up and I'm going to change where my hand is. So there we go, right?
And because this is ik, we just need to affect that wrist bone and the rest of the arm will follow. So we add a keyframe and there we go, tapping my head right? For the rest of the animation, it's going to be where I put this hand. So what we wanna do is to fix that, is we're gonna add a keyframe right here when the animation is ending. And then right here, when my hand lands, I'm going to go, and if I hit this, if I hover, you can see zero key layer. It says if I hit that, it's going to go back to how it was before we did any changes, right? So boom, it's a slight change, but you can see it, it went back to the default of the actual mocap animation where it was before we made that change. There you go. And you can see if we wanted to fix this clap here, right? I'm still on the layer with this right hand. I would create a keyframe right here. And then right at the moment of the clap, let's bring this hand here, add a keyframe, clap, clap. When we want our animation to end, I'm gonna add another keyframe and then zero out the key.
And then what we could do is we could go and grab the right or the left hand, create a new layer, and remember to click on the right layer that you're in. And here, right, we're gonna add a keyframe right here, right at the clap point. We're gonna move this back a little bit, add a keyframe, and there we go. Look at that. So now it is clapping. She is clapping, right? She's tapping her head, she's clapping. Everything looks good. We could go in and additionally see this, all this clipping that's happening here, right? Of this arm. So we could go in and we could fix all of this, right? So I would create a keyframe right here, right when the arm lands, maybe we just give it like a little space, right? Oh, and this is why this workflow is so powerful, right? We can just correct that wrist and now it's not clipping. And if we want that to end, we would just add another keyframe and zero it out. Although, you know, maybe it's not ready to be zeroed out. Maybe we would do that keyframe, zero it out right there and we fixed some clipping.
So all really powerful ways to do mocap editing in Maya using that control rig, right? And some other things that I typically do sometimes is sometimes I'll just go in and we can find all those control rig you know, nulls by going to that human IK panel clicking here. Sometimes, especially with characters with big hips or big bellies, I'll just go in and for the whole animation I'll make the arms like this. So they're just out a little bit more, right?
Another thing that I often have to go in and do is like, you can see right here that maybe this, you know, this thumb is a little bit funky, so we could go in and fix stuff like this, right? I would select the thumb, which we go in if you need to, you can go in and find these, you know, but I can see this little, this little null right here. Go into the channel box layer editor, create a new layer, make sure I'm on it. And then maybe just for the whole animation, I just want it more like that. You know, add a keyframe. And so the whole animation will be like that. The pinky too, right? This looks a little wonky. Add a new layer, go on to it, boom, get it in line. Boom. Now that hand looks way better, right? And it was, it was very easy to do. So this is a really powerful workflow and this is what I use whenever I need to create things that are, you know, really high quality. This is the AAA workflow I'd recommend just because Maya makes it so easy to do all, all these things.
Butterworth Filter Perfection (23:40)
So the last thing I want to cover is just the Butterworth filter, which is a really great filter that kind of has something similar in blender and cinema a little bit, but it's really great in Maya. And this is a filter you can use to just smooth out all of your motions in general and kind of give you more of a Pixar or a stylized or a keyframe animated vibe where, you know, animated characters were trained to kind of see them move.
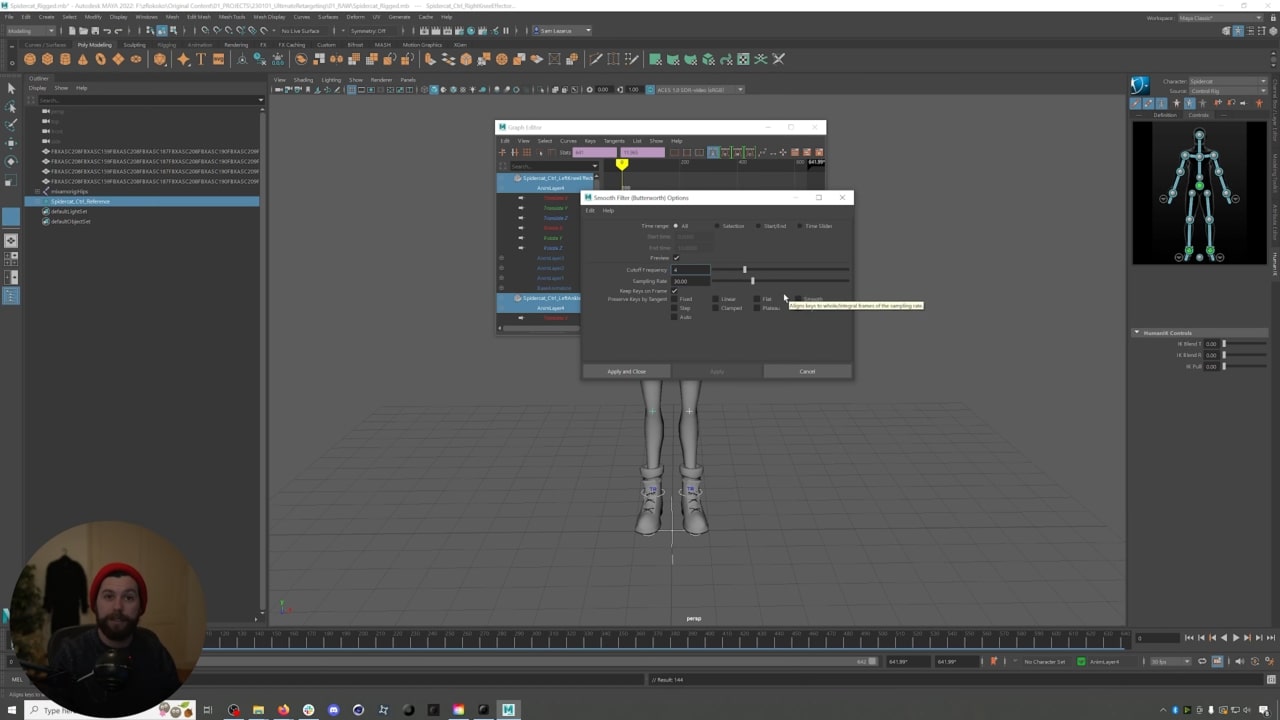
Like digital characters, not like humans. When you do mocap, your character really moves like a human. And so sometimes you want to kind of soften that out and the Butterworth filter is an amazing way to do that. So to do that, I'm going to select, and this is what I usually do before I do any of my editing. As soon as I've done the retargeting bake to control rig, I come up to my human IK panel. I select all of these nodes, so all the controllers for the character go to Windows animation editors, graph editor. So this looks really scary, but we're not gonna mess with this. I'm just gonna select this whole thing. Sometimes you can get errors and I find you get fewer errors if you add a Euler filter first. So I'm gonna add a Uler filter and then I'm gonna add a Butterworth filter and I'm gonna do it with the options.
Click that little square to see the options. So cutoff frequency at seven is the default. I usually go down to like a four. The lower you go the more smooth all of your animations will be, and you can kind of overdo this to the point where your character is like barely moving. So play around with this. I usually go to four. It depends on what I'm trying to do and, and what it calls for. But if we apply and close, you can't really see it, but it added a bunch of it, it basically Bauer curved all of our keyframes, right? And you might not be able to notice it, but this character just moves much smoother and with less jitters and less kind of hand things you can kind of see right there, right when the hand stops, it really stops. And it just gives you this really buttery smooth look that is just fantastic and is super usable.
And I use it on a lot of my animations because I just want to just kind of get that really hand animated kind of key pose, you know, kind of smoothness and you can see it's really smoothed everything out. So, that is fantastic. And there you go. That is the whole workflow of how I would go about, you know, getting my recorded motion capture onto a character in Maya, how to characterize, how to retarget that mocap using preset or saved bone maps, you know, right, that we created right here. And then how to do some motion editing and how to smooth out your animation, all of which I think are really important things to know for this workflow. So there you go. Put your comments or questions down below and we'll try to answer them. There's also a free project file that's set up with a character from Mixamo already, in the description below. And also check out our other retargeting workflows. We have a bunch of 'em dropping. The new Rokoko Studio is better than ever. We have our new Rokoko video tools that are really fun to play with. And there you go. So that is the whole workflow. We'll see you in the next video and hopefully found this helpful. Okay, see you all. Bye-Bye.
Frequently asked questions
Read more inspiring stories


.jpg)

Book a personal demonstration
Schedule a free personal Zoom demo with our team, we'll show you how our mocap tools work and answer all your questions.
Product Specialists Francesco and Paulina host Zoom demos from the Copenhagen office


