
iClone Retargeting Workflow: The Ultimate Guide to Retargeting
Below, please find a transcript of the video tutorial.
Introduction
Hey everyone, I'm Sam Lazarus, creative director for Rokoko. And welcome to this retargeting tutorial for Character Creator 4 and Icon eight. So we're gonna go soup to nuts in this tutorial. We have some motion capture that we created in the new Rokoko studio, which will clean up and export out to iClone, where we're gonna take a character that we made in Character Creator 4. Send that over to iClone, put the mocap on that character, do some very easy mocap editing, which is so powerful in iClone. And then at the end of the video, we're gonna go through a workflow for taking a mocap take that doesn't have hand we facial animation data. We're gonna take that in icon really easily, add some finger movement and some facial animation, and then have a fully animated character. So without further ado, let's jump into it. It's gonna be a lot of fun.

Exporting Rokoko Mocap
So here we are in the new Rokoko studio. I've already gone in and recorded some body and hand motion capture data. And if we look at what we recorded here, I have a little wave, you know, doing my karate kicks. And then I'm going to go and touch the top of my head. And you can see that I don't quite make contact also with clapping, that my hands are kind of going through each other. And that's a common problem in inertial motion capture. Like with Rokoko, sometimes things aren't going to match up perfectly and you're gonna need to go in and do slight edit. And iClone makes it really easy actually to do motion capture editing. So we're gonna go over how to fix things like tapping the top of my head correctly and clapping and, and things like that. But for now, we've got our motion capture and we need to export it out.
So I've already gone in, cleaned it up. We have tutorials on our channel to show you how to actually record all this mocap. We have a great onboarding series, but I've, I've already renamed my take. And I'm going to add it to the export list. And then if we go over to the export tab here, we're going to export it out an fbx. We don't need a body mesh and we don't need face for skeleton preset. I'm going to put it on Mixamo, which I've found works really well in this workflow. The other skeleton should work too, but I'm gonna be using Mixamo I'm not gonna do anything for preset overrides, I'm going to export it 30 fps, although you could do higher FBS if you need to. I do a binary FBX when I export it. And that's pretty much it. We're gonna hit export and now I'm gonna go hop into Character Creator 4, where we're going to create a little character and send it into iClone.
Creating and Exporting a Character in CC4
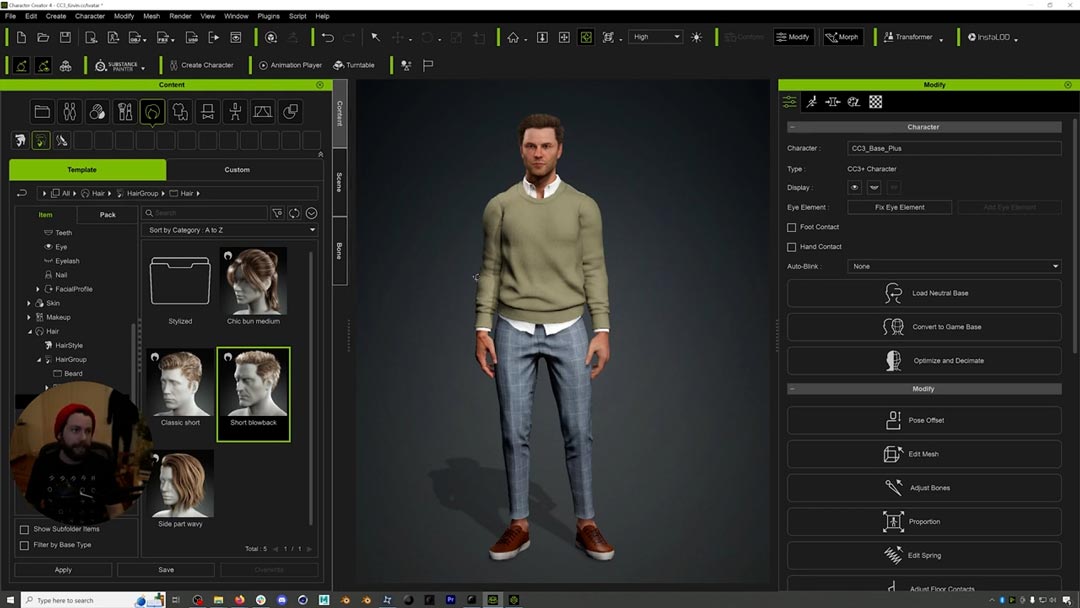
Okay, so here we are in Character Creator 4 and you know, as I said before, we're going soup to nuts. So you can just use characters that you have in iClone. You don't need to use Character Creator 4, but in case you are, I thought we'd just go through and, you know, make a quick character. Let's make this Kevin character load it in, we'll add some clothing and things.
Boom, look at this guy. You know, fancy, fancy fellow here. But you could create any sort of character, right? And character creator. And I just created something very basic just because we're gonna send it over to iClone right now. But the great thing about Reallusion is that no matter what type of crazy character you create using character creator, it doesn't affect this workflow. And usually you can actually interchange characters with the same animation and things. So anyway, let's say we're done creating this character. He looks great. I've got Ilon eight open already. And so I'm just gonna go to file, export, send to iClone, send to iClone, and then we're gonna let it kind of do its thing here.
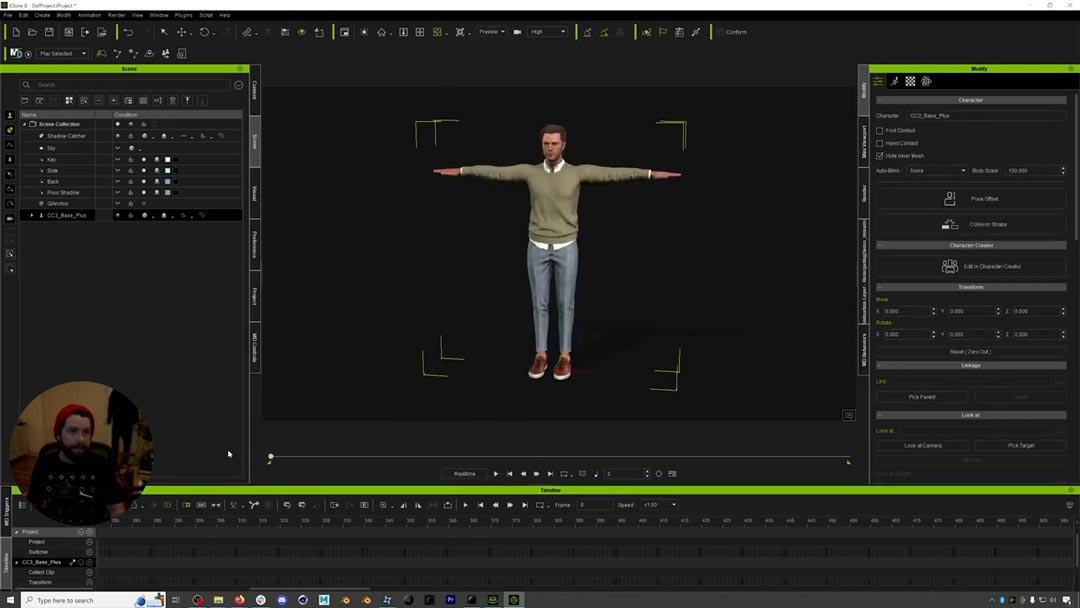
Retargeting Rokoko Mocap in iClone8
And if we hop over to iClone, yeah, you can see that it's loading in this character for us. And there we go. We've got a character. And now we just need to load in some motion capture onto this character. So if we go to our mocap that we export it, and you can see it's right here. And if you ever need to find the motion capture that you export, you can just go to open folder. You know, you can set where you want to export to right here when you're exporting. And then you can just go open folder, find the folder. And we're actually just going to drag this onto our character, not into the scene, but onto our character. You can see we get this bounding box when we do that. And now we go to motion import settings. This should pop up and you want to go for motion T-pose because Rokoko always exports out as a T-pose in the first frame. We just want to go to the motion capture that we loaded in.
So again, that retargeting demo and I just had the the path saved and I copied it in retargeting demo Mixamo into this motion T pose and hit convert all. And it's really that easy. And our mocap is just gonna be on our care. You can see frame zero. Our mocap is a T-pose, so that's right, we at play. There we go. Does that look familiar or looking good? So we got our mocap and this all looks awesome. So that's it.

Motion Capture Editing in iClone8
That's basic retargeting in in in iClone, but it's really easy to go in and edit your motion capture, which is really amazing. So let's go and do that. And so if we right click on this motion down here and if you wanna get to this view, I just like going to window workspace, all panels and then I just, I don't need to see the curve editor.
Then I have this big timeline down here that I can see if we right click on this animation here, you can see it says motion and we go to motion modifier here. We can make some slight tweaks to the motion capture overall. And then later we can actually do precise changes to the mocap. So if we hit preview and space bar, it'll start playing. But you can see we can start playing around with some of these modifiers. Let's say that, you know, we just want to exaggerate all the mocap more. We can turn that way up, we can turn it way down, set it back to zero. That's for the upper body, the lower body. Sometimes you know, you have problems with shoulders being up too much in Rokoko motion capture. You can see these shoulders are a little bit like up. So maybe we just want to go to shoulder down.
We can see we're bringing these shoulders down a little bit more natural. Looks way better already, right? And so we'll we will stop previewing, but you can preview and make those changes and then you'll hit okay and it will apply those changes to that motion captures. So this already is incredible, you know, being able to just make overall changes, fixing things like sometimes characters are lean too far back, sometimes shoulders are up and it's really easy to just open up that window and make those changes overall. And you can see for the rest of the mocap, you know, it's put the shoulders down, it looks great. So what if we want, however, to fix something like this, right? Well, this actually looks ended up looking pretty good, but let's play this through. You can see we, we kind of need to tweak it though, you know, that's where he taps the, the second time on the head. What if we wanted to bring this arm down or do any other type of mocap correction? You know, usually there's like clipping issues. Let's go and see if we can see any clipping issues. Maybe. So right here, for example, let's fix this cuz this is a little bit more dramatic, but what if we need to fix this arm going through his body, right? That's no good. So if we were to go up
And we went to edit motion layer, it gives us this awesome window from which we can make overall changes and edits to the motion capture. So in this case, if we wanted to grab this wrist and everything is on an IK control rig, so it makes it really easy, we can just go and we need to fix this clipping, right? Right here. It's going through the, the it's going through the body. So we have this wrist selected, we can hit set key. So we just added a key frame, right? And you can actually see those key frames. But we drill down here, but then we can go to where the clipping occurs. Right here you can see that the hand is like inside of the body. So we just need to move this out. And there we go. And because it's on IK it makes it really easy to make these changes. We don't need to adjust the upper arm and then the forearm and then the hand, we just move the hand around set key and it will fix that clipping, right? And then we could go here and reset
And see it's fixed the clipping. And now it goes back to how it was initially when we hit reset. It basically takes it back to the initial motion capture, right? Because we didn't want to fix that hand for the entire course of the mocap, just when it goes into the body and that one moment. So it's really easy to set these keys and make fixes like that. You can also do things like if I grab onto, let's say the wave right here, right? We're waving right here, I can grab onto this little button and I could animate the whole hand and if I, I can just drag around and make these edits and you can see how easy it is,
You know, to make these mocap edits. So that is all really fantastic. So now we're going to, you know, that's basic retargeting. Looks great, you know, we can close this out now, this is awesome. So that's how we'd make edits and, and everything.

Adding Finger and Facial Mocap
But how would we go about doing live hand puppeteering and then adding facial motion capture to this as well. And we're gonna redo this workflow using a Rokoko video asset, which doesn't have facial motion capture, it doesn't have hand movement. And we're gonna go through that and, and show you how easy it is to add in some of those finer details to make your mocap saying. And you could add, you know, you could, you could digitally, you could puppet the hands on this character in this workflow. You could add facial motion capture to this character here. We're just gonna do it again with the Rokoko video character because it's Rokoko videos free.
And so you could follow along with this workflow we're about to go over. So let's do it. So here we are@video.Rokoko.com. We have a whole tutorial on how to create motion capture with our free AI tool Rokoko video. So we'll just create a new scene. I'm gonna call this I clone test create scene. We're going to upload a video file that I've recorded before. So we'll hit upload. We could also just use our webcam. But I'm streaming, right? You know, I'm recording right now so I'm not gonna do that. So I'm gonna upload that video file that we recorded before, throw it in here
And we can trim our file to just pick the points that we want. And I kind of did like a scary, a scary monster kinda kind of thing here. So let's play through this. Ah, and so we're not gonna have any finger movement, so we're gonna be able to add in finger data and also face data to this animation that we're about to make. So here we go. Here's my animation trim, the in and outs cuz I wanna stay in the frame, turn into animation. And again, you can watch our tutorial on how to create motion capture using Rokoko video. This is a free tool, you just need a webcam or video recorded on your cell or something. And we have dos and don'ts for making that motion capture how to get the best results in some of our other videos. And then after this is processing, you can see it's already going through, we'll just open up Rokoko studio again and refresh the page.
And this will, this mocap will pop up into Rokoko studio. Okay, took a few minutes just to upload and process and there we go. And now if we go back into Rokoko studio, we go back to the homepage and we just hit refresh, it should pop up and I might be blocking it right here, but you can see I clone test just popped up. So let's open that up. I'll move my camera back. And in here should be that mocap take and we'll see if it was good or if it was bad. You never really know where, what you're going to get. Sometimes you need to rerecord, but if we hit play, boom, there we go. Spooky monster, you know, scaring, which is what we're trying to do, right? We're doing a monster waving its arms. That's kind of the vibe that we're going for.
Again, you know, you could go through and do cleanup on this. We're not going to because we're gonna do some cleanup in IClone. So this is pretty much good as is. And again, if you wanna know more about how to work with Rokoko video motion capture, free AI motion capture, check out our full tutorial on it and it goes through everything. So we're gonna rename this monster r kv Rokoko video and we're gonna go add it to the export list. And under export, same thing as before, Mixamo skeleton binary 30 fbs. Don't need the body mesh, don't need the face. And we'll hit export. And then once that's done, we can just hop back into Icon. So mocap all done here and we'll hop into Ilon. And for this, we're not gonna create a character, we're just going to go to some of the free characters that come with Icon.
If we go to Actor Core Crowd, you can download these characters. They're kind of preset characters for you to play around with. But this great tune goon. And again, we can hot swap out these characters by dragging them onto each other which is great even after we've applied motion capture. So same thing that we did before, right? We're gonna go to exports. Here's our monster, R K v Mixamo, right? That was what we just exported from our Rokoko Studio. Drag that onto our character. We're gonna load in that same mocap take that we dragged onto our character as the T-pose motion. T-Pose optional Hit Convert all. And then it's gonna, it's gonna work really well Look at this right off the bat. So here we go. We've got kind of a monster moving around doing monstery things, but maybe we need to fix some of this. Or, or at the very least, just add some more detail like the fingers and hands are moving and the facial mocap moving. So first let's do fingers and hands. So this is going to use that motion puppetry script that we talked about before. You can find information on how to download and, and install it. But then you'll go to Python samples and hand gesturing puppeteering will pop up and you can load in when we hit preview,
You can load in different gestures and then I can in real time drag around and you can see maybe that my hands are open and closing and I can kind of puppet this in real time, which is really cool. So let's record some animation, some fa some hand animation to this character. So we want both hands and we're just gonna hit record and we're gonna hit Space bar. And I kind of like generally to alternate between like the fist and then this kind of pose, this natural hand pose and like pointing can be kind of nice to it. Just add some more interest, right? We'll hit space bar to record. So whoa, hands open, hands closed. Oh, I'm pointing. Oh, kind of opening and closing my hands.
Woo pointing. There we go. And I could go through and I could redo this a million times, right? I could also key frame in these poses, but you can see we have our animation in our scene, which is so cool that we were able to do that just live, right? But if we wanted to, we could go in. There's, there's, if you, under animation, there's free poses, you go into gesture, you could key frame in these gestures. If you didn't wanna do it like live, you wanted to go very methodically by the timeline and kind of change between these. It's easy to add these in and just key frame between them. But that is a really fun way I think to add a little bit of realtime hand gesturing to your character. So now what if we want to add in some facial motion capture?
So this is going to require a plugin the Face Mocap plugin. So I'm actually on a trial for it for iClone 8. So we're gonna use the trial, we won't be able to record, but I can still show you the process for how you would get it working. So you're gonna need an iPhone 10 or higher. I have one right here. And then I don't know if you need to be on the same wifi, but I'm going to be on the same wifi just to make sure. So we'll go to get on Alex wifi and do the same thing on our iPhone. And I'm going to record this. Hopefully it should show up <laugh> there on screen as well. But we are recording and we're gonna open up that Live Face app and here we go. So, hi there I am tap for a wire frame and you can see this is I clones facial motion capture app that you need an iPhone 4.
But this is the best way of getting facial motion capture onto your characters. And it requires additional purchase, but you can do the trial for free. So you can play around with this workflow for free if you want. So how do we get this onto our character? Well, after you've installed the plugin, again from the re illusion hub, you click iCone, you see all the plugins, and we go up to plugins and we'll go to Motion Live and open that up. And I'm also gonna go to the beginning of my timeline. So here under Live Face you can see that we have an option live face. And if this wasn't here we go to add Live Face. And it should be pretty easy to add in if you've already installed the plugin. But you can see under Connection, if we try to hit Enable, it's gonna give us this warning failed to connect. And that's because if we look at our iPhone screen, you can see the IP address that we need to connect to. It's right there at the top of the screen. So it's 1 92, 1 68 5 0 2 5 4, and I'll put that under connection. And then now when I hit Live Face, look it connected. And if I add on tune goon live face, we hit preview.
Oh, I'm piloting my character live, right?
And so we could easily go in and record motion capture for this performance, you know and record it onto our character. And again, we can't record because it's locked because we're on a trial. But you can go in and play around with this if you have the plugin, it's really easy to use just to hit record. And then here, we'll, we'll do a little take here with with our character if we were going to record. So we'll do a preview and then again, I'll kind of look at my character and I'm going to try and match the movement. So
Ah. Ha ha oh, I'm scaring you. Ah, oh,
There we go. And you can see how easy it would be to go in and add in some motion capture really easily some facial motion capture to your character. And so that is, you know, the whole workflow for iClone. There might be other ways to do some of these things. I really recommend checking out Kai Dene on the Reallusion channel on their YouTube channel. They have tons of tutorials on how to go in and edit motion capture, and do really interesting things, foot locking and foot key framing and doing all these interesting footstep things. And there's a bunch of interesting ways that you can edit motion capture in iClone. And it makes it really easy to take what might be just an okay take fix, clipping, you know, make add facial and, and finger animation and stuff. It's, it's really powerful tool.
So hopefully you found this video to be helpful. If you have questions, put them in the comments below and we'll try to get to them. And other than that, stay tuned for, you know, more iClone comment content in the future. We want to keep using it. It's such an amazing tool and hopefully we actually have for some of our animation challenges with prizes that are iClone licenses. So stay tuned for, for those if you want to get into this workflow. So we'll see you in the next video. Thanks so much for tuning in and go make some awesome mocap everyone. Bye-Bye.
Frequently asked questions
Read more inspiring stories


Book a personal demonstration
Schedule a free personal Zoom demo with our team, we'll show you how our mocap tools work and answer all your questions.
Product Specialists Francesco and Paulina host Zoom demos from the Copenhagen office


